Central operating guide for daily workflows in StarSellersWorld Products Light.
This Knowledge Base covers the Dashboard, Item Manager (Manage Items), and Data Import (File Import) modules. Click on any screenshot to enlarge it in full resolution.
Privacy Notice: For data protection reasons, all customer-related data, supplier and account names, product information, and sensitive business data in the screenshots have been anonymized or blurred. As a result, individual areas of the user interface may differ slightly from the live application.
1. Dashboard – Seller View
Quick Guide for Key Metrics, Detailed Views & Personal Configuration • Version 1.4
The Dashboard is the central home view of the seller workspace. It consolidates essential key metrics regarding orders, item status, Buy Box share, refunds, imports, and technical background services.
The displayed figures primarily serve for quick orientation. Any anomalies can be inspected more closely via the detailed popup views or the linked workspace modules.
Note: Metrics shown on the Dashboard are snapshots in time. For binding financial or operational evaluations, please use the dedicated reporting and export processes.
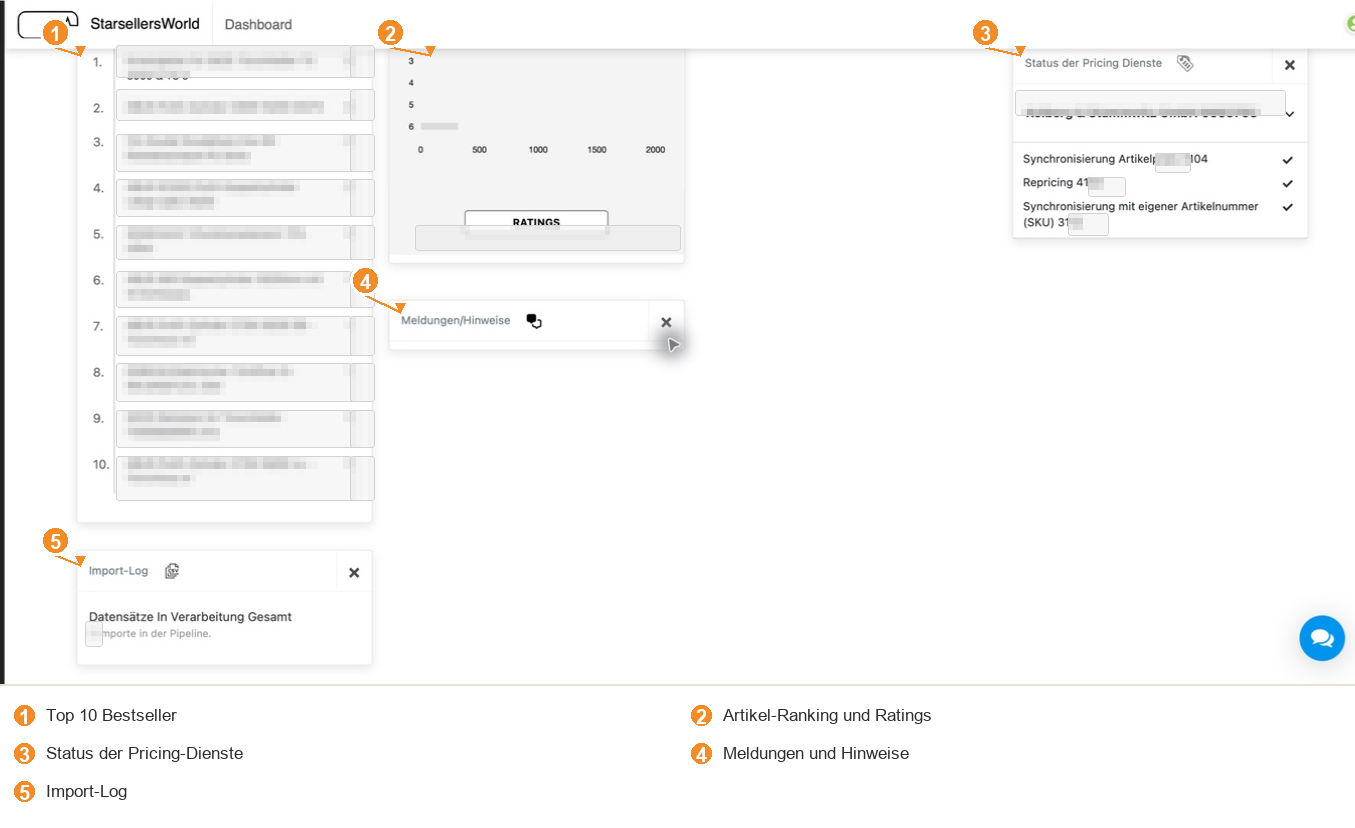
The home view consists of individual modules (widgets). Each module answers a specific control question and can be shown or hidden depending on your personal configuration.
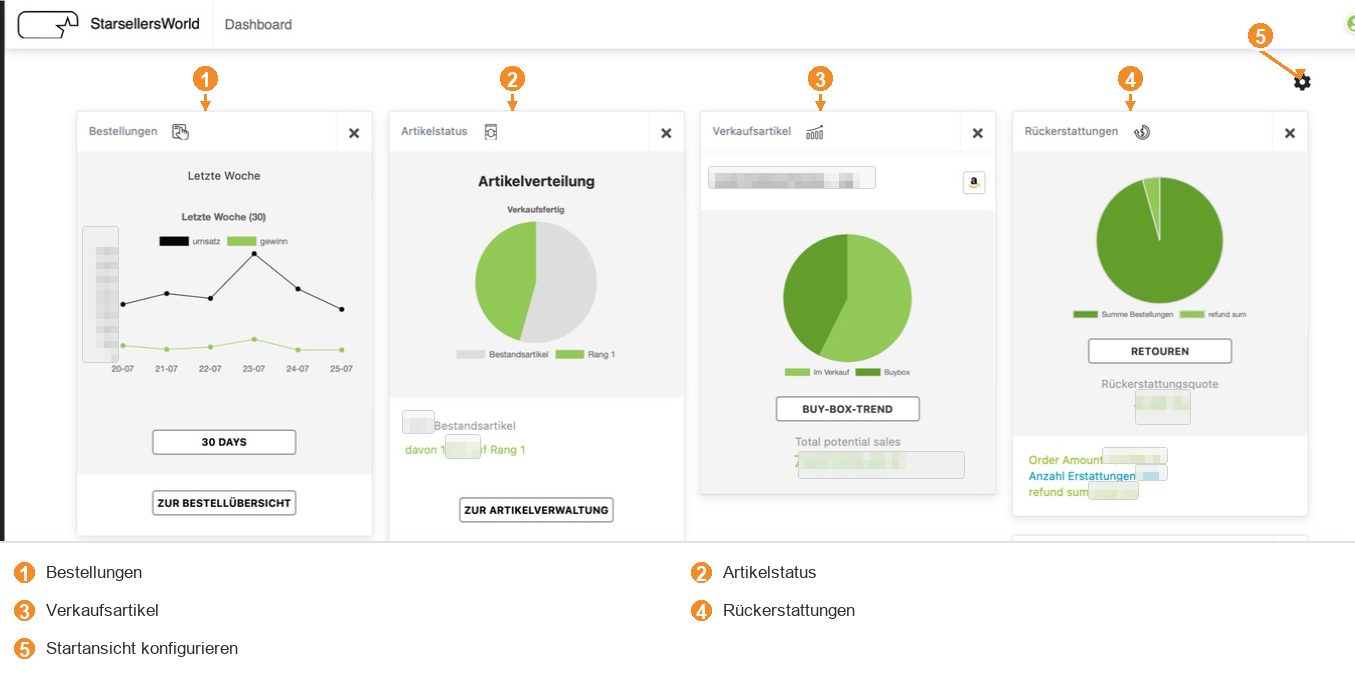
Figure 1.1: Dashboard with Orders, Item Status, Sales Items, and Refunds (Source: images/dashboard_01.png)Click to enlarge
1
Orders (Bestellungen): Check orders and noticeable trends over time first (revenue vs. profit over the last week).
2
Item Status (Artikelstatus): Compare item distribution (stock items vs. items on Rank 1) and sales readiness to spot deviations early.
3
Sales Items (Verkaufsartikel): Monitor the ratio of items currently on sale (Im Verkauf) vs. holding the Buybox, as well as the total potential sales volume.
4
Refunds (Rückerstattungen): Monitor the refund rate, order amount, number of refunds, and total refund sum.
5
Configure Home View (Gear Icon top right): Opens the module selection dialog. Only use detail buttons when a specific metric requires deeper investigation.
Several modules open additional information in an overlay window above the Dashboard while keeping the Dashboard active in the background.
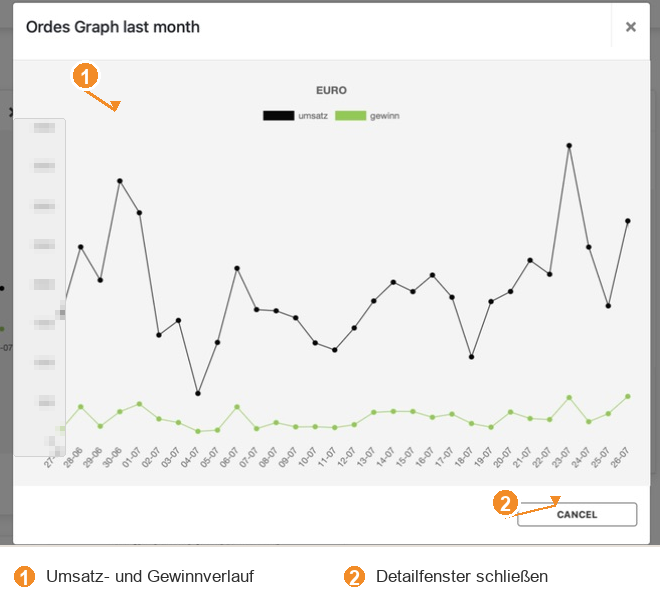
Figure 1.3: 30-day trend of revenue and profit (1: Revenue and profit chart, 2: Close detail window) (Source: images/dashboard_03.png)Click to enlarge
1.4.1 Time Trend and Ratings
30 DAYS opens a chart (Ordes Graph last month) displaying revenue and profit over the last month in Euros.
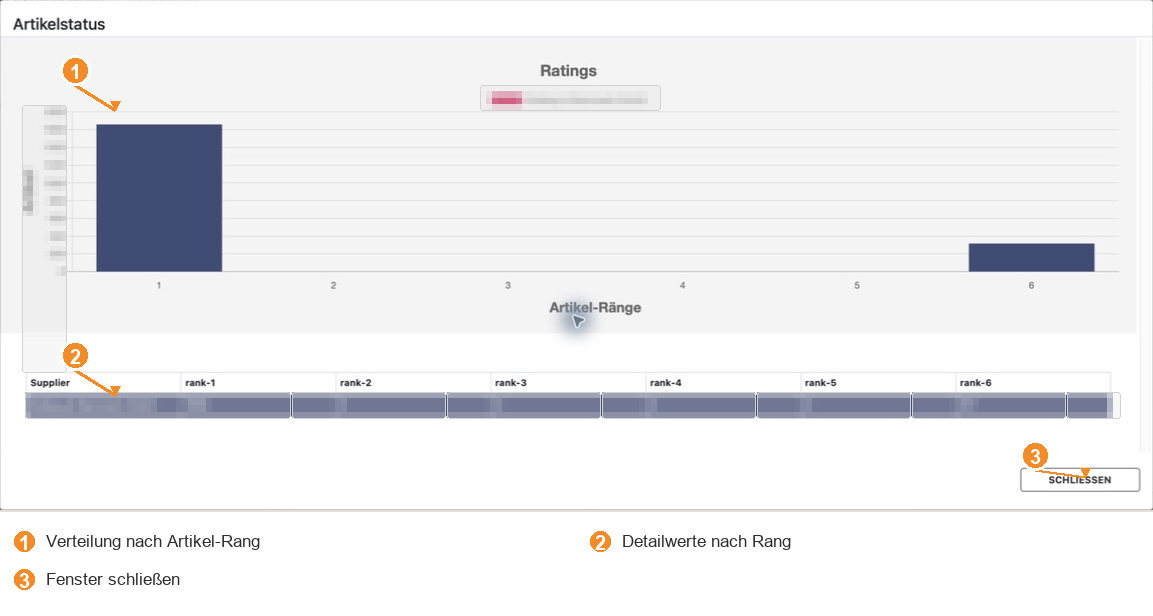
RATINGS opens an overview of item distribution across Rank 1 to Rank 6.
SCHLIESSEN (Close) or CANCEL closes the detail window and returns to the Dashboard.
Figure 1.4: Detailed view of item distribution by rank (1: Distribution by item rank, 2: Detailed values by rank/supplier, 3: Close window) (Source: images/dashboard_04.png)Click to enlarge
1.4.2 Buy Box and Refunds
BUY-BOX-TREND opens the historical Buy Box development for the displayed seller account.
RETOUREN (Returns) opens the detailed view of refunds. The displayed content depends on the data available for the seller account.
ZUR ARTIKELVERWALTUNG (Go to Item Management) and ZUR BESTELLÜBERSICHT (Go to Order Overview) leave the Dashboard and open the respective workspace.
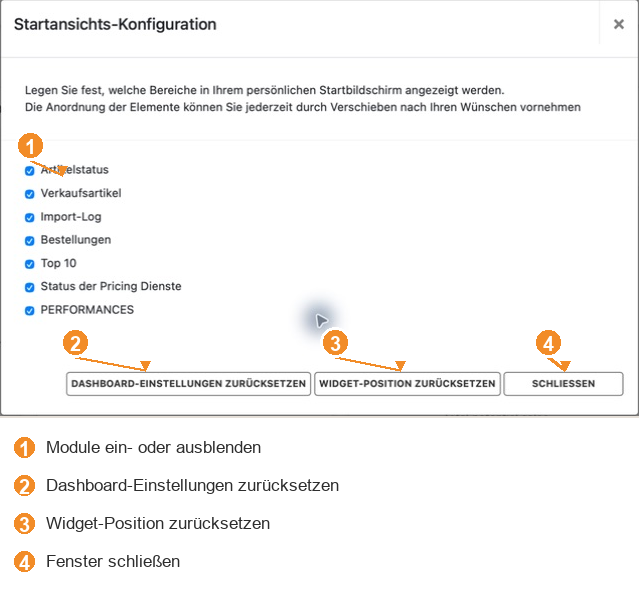
Click the gear icon in the top right corner to open the Home View Configuration (Startansichts-Konfiguration). Here you define which modules are displayed on your personal Dashboard.
Figure 1.5: Personal selection of visible Dashboard modules (Source: images/dashboard_05.png)Click to enlarge
1
Show or hide modules: Check a box to display the corresponding module. Uncheck a box to hide the module from your home view. Modules can also be rearranged on the Dashboard at any time via drag and drop.
Close window: Close the dialog via SCHLIESSEN once your selection is complete.
Important Note:DASHBOARD-EINSTELLUNGEN ZURÜCKSETZEN and WIDGET-POSITION ZURÜCKSETZEN reset your saved module selections or widget positions back to default. Only use these buttons if a reset is explicitly intended.
1.5.1 Hide and Restore Modules
Clicking the X in the top right corner of any module hides that section immediately. A hidden module can be re-enabled later at any time via the Home View Configuration (gear icon).
Why are individual modules missing from my Dashboard?
The module may have been hidden via the X icon. Open the Home View Configuration (gear icon top right) and re-enable it.
What does a checkmark (✓) next to the Pricing Services mean?
The checkmark indicates that the respective background service is active and running without any visible disruption.
What can I check if the Returns (RETOUREN) window shows no content?
First check whether refund data is available for the selected seller account. If the view remains empty, clarify the data status via the designated internal support process.
Do the chart buttons modify any live data?
No. 30 DAYS, RATINGS, BUY-BOX-TREND, and RETOUREN only open read-only detail views.
When should I reset the Dashboard?
Only if your personal layout is displayed incorrectly or if you intentionally want to restore the default factory arrangement.
Products Light is the central workspace for quickly checking product data, prices, inventory, and offer information. The Seller View (Verkäuferansicht) helps you monitor the most important signals for Amazon and other marketplaces in one place.
To get started, new users typically work in three steps: first check the workspace dashboard, then narrow down products using search or filters, and finally open the detailed view of a specific item. The interface also contains action buttons—only use these when a data change is explicitly intended.
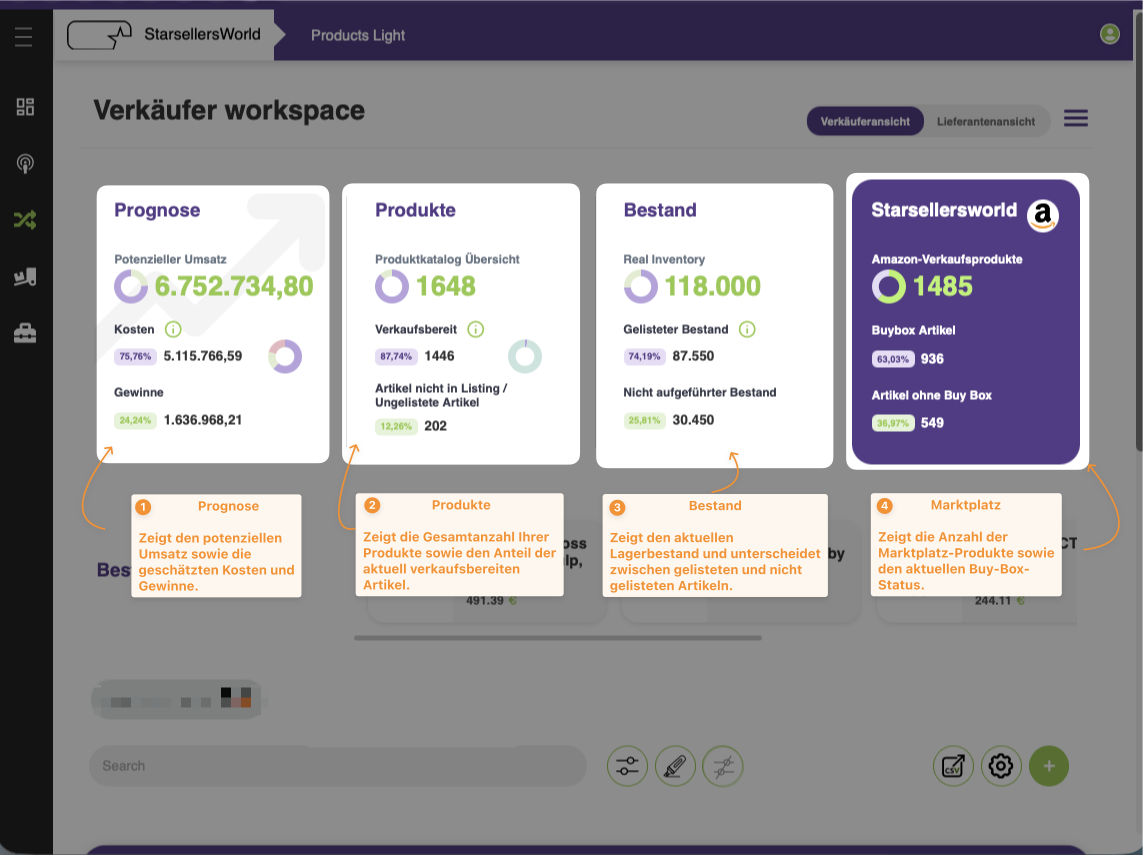
The upper workspace dashboard shows the state of your seller account at a glance. The metrics are designed for orientation: they highlight where revenue, product coverage, inventory, or Amazon status require special attention.
The four KPI cards help users answer the most important questions first: How is the account developing, how many products are active, how much stock is available, and how many items currently hold a Buy Box or have no Amazon listing.
Figure 2.1: Workspace Dashboard with metrics for Forecast, Products, Inventory, and Marketplace status (Source: images/item_manager_01.png)Click to enlarge
1
Forecast (Prognose): Displays potential revenue (Potenzieller Umsatz) as well as estimated costs (Kosten) and profits (Gewinne).
2
Products (Produkte): Shows the total number of products in your catalog, the share of items ready for sale (Verkaufsbereit), and unlisted items (Artikel nicht in Listing / Ungelistete Artikel).
3
Inventory (Bestand): Displays current warehouse stock (Real Inventory) and distinguishes between listed stock (Gelisteter Bestand) and unlisted stock (Nicht aufgeführter Bestand).
4
Marketplace (Marktplatz): Shows the total number of Amazon sales products (Amazon-Verkaufsprodukte) split into Buybox Artikel and items without Buy Box (Artikel ohne Buy Box).
2.2.1 Bestseller Products
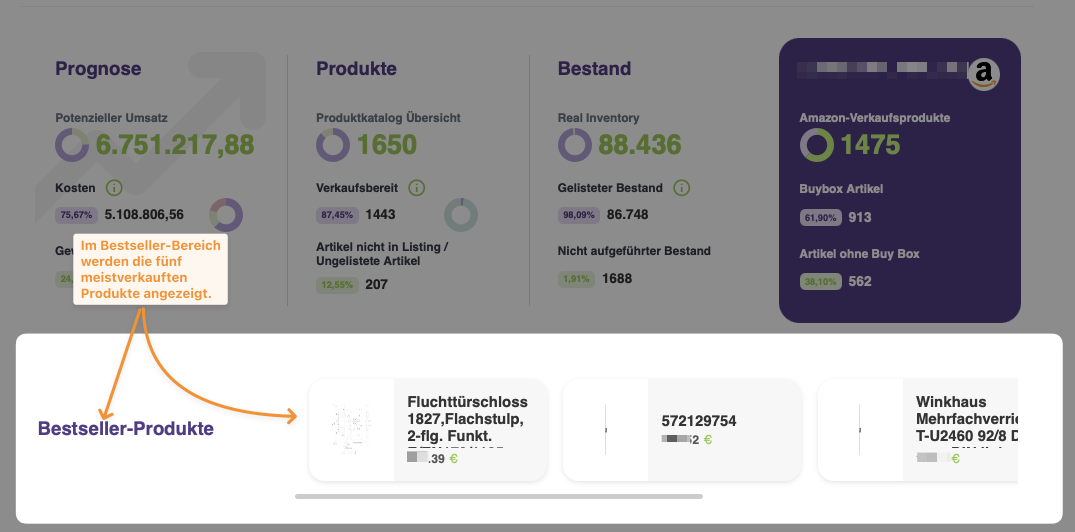
The Bestseller Products section (Bestseller-Produkte) displays the five best-selling items that are particularly important in day-to-day business. These products should be checked regularly because price, stock, or Buy Box changes here can have immediate business impact.
If a bestseller shows unusual values, open the item in the product table below and inspect its detailed view to trace pricing logic, availability, and offer data.
Figure 2.2: Bestseller Products as a quick entry point into top-performing items (Source: images/item_manager_02.png)Click to enlarge
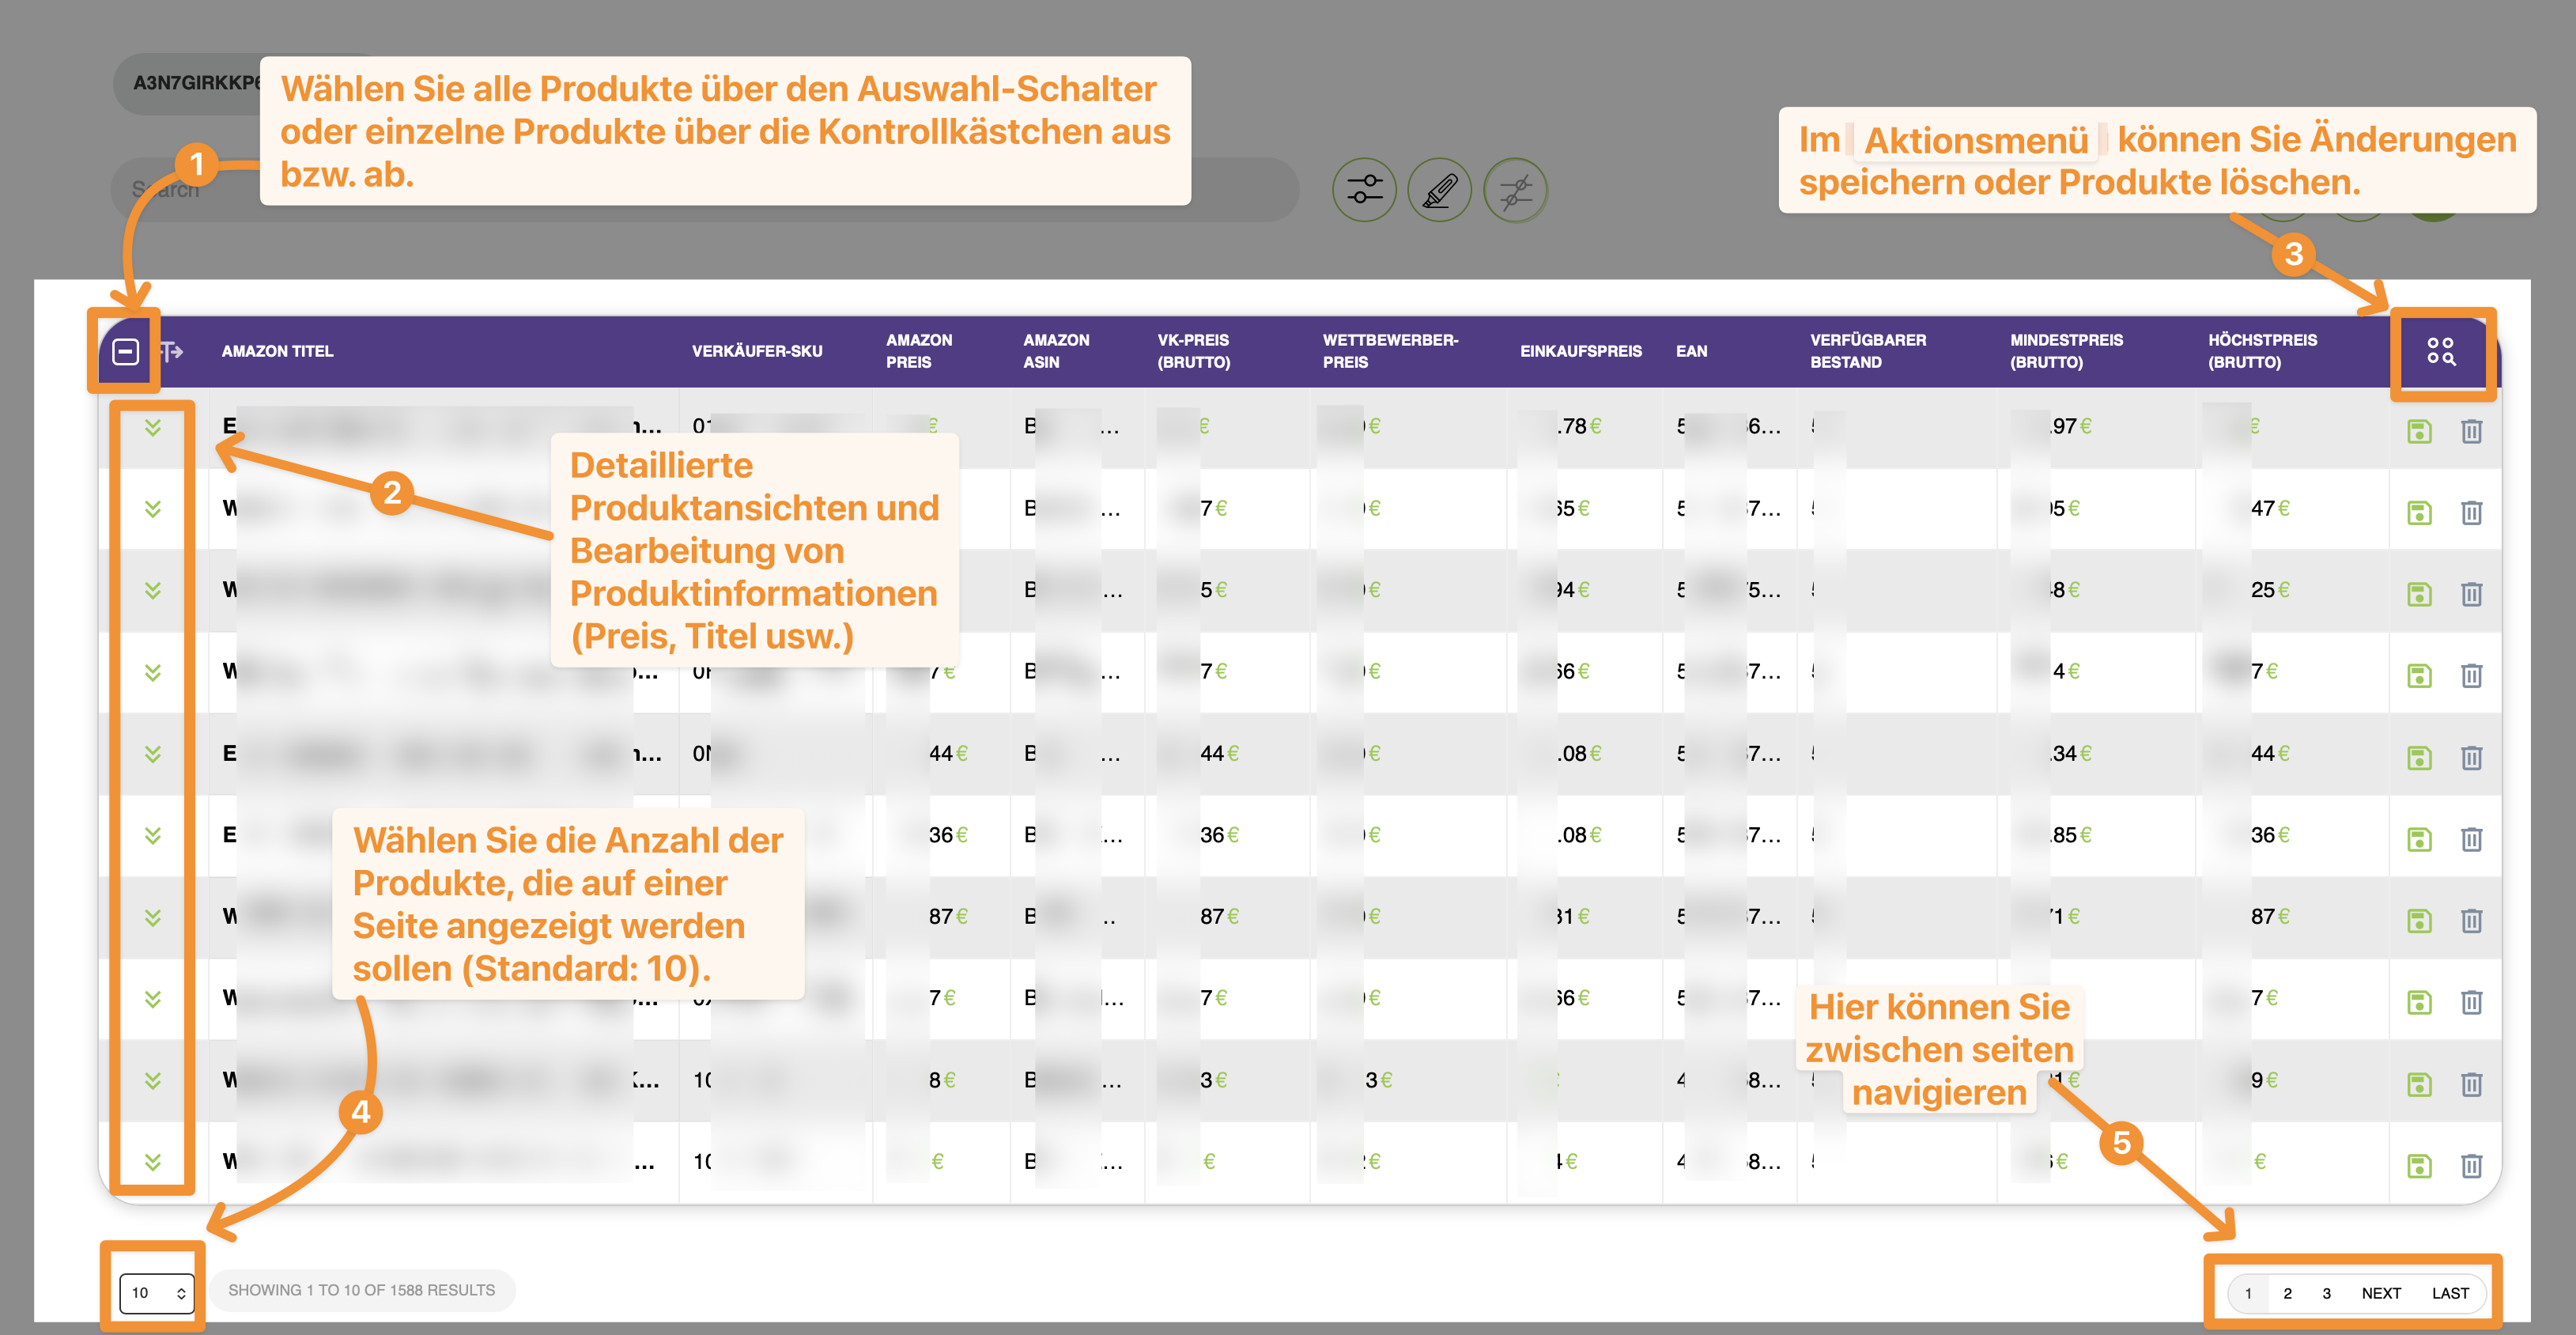
The product table is the primary working area in Products Light. Each row represents an item; the columns display attributes such as Title, Seller SKU, Amazon Price, ASIN, Gross Retail Price, Competitor Price, Purchase Price, EAN, Available Stock, Minimum Price, and Maximum Price.
Use the table not just as a static list, but as a control center: search, filter, customize columns, and then open the exact item you need to inspect.
Figure 2.3: Product table with sample values and main navigation controls (Source: images/item_manager_03.png)Click to enlarge
1
Selection Toggle: Select or deselect all products via the master switch in the header, or select individual products using the row checkboxes.
2
Expand Detailed View: Click the green arrow on the left of a row to open detailed product views and edit product information (price, title, etc.).
3
Action Menu: Use the action column on the right to save changes (disk icon) or delete products (trash icon).
4
Items per Page: Select how many products are displayed per page (default: 10).
5
Page Navigation: Navigate between pages using the pagination controls (1, 2, 3, NEXT, LAST).
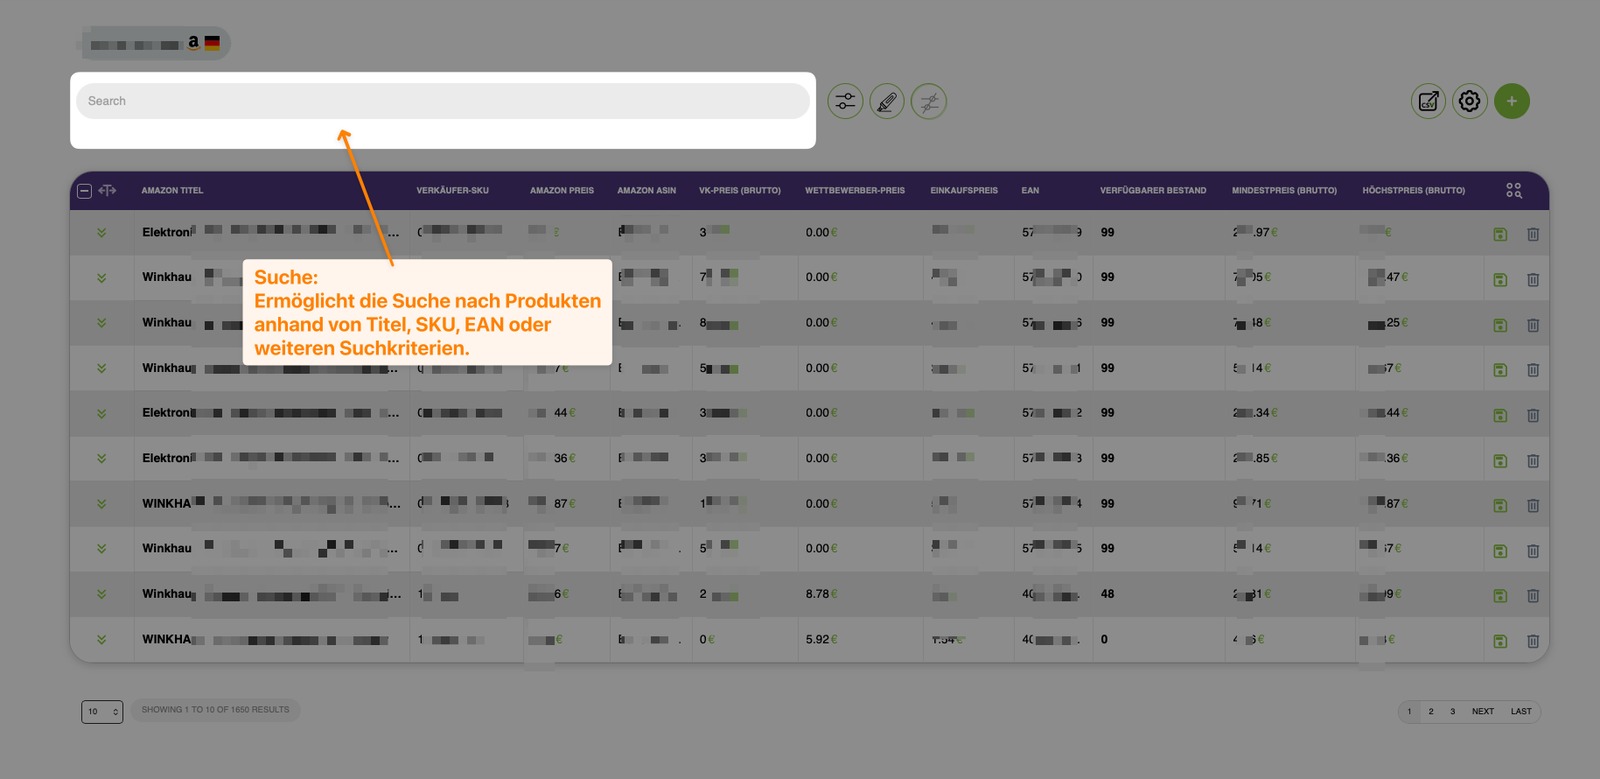
2.3.1 Search Function
The search bar (Search) lets you find individual items quickly without scrolling through the entire table. Typical search terms include a product title, SKU, EAN, ASIN, or other unique identifier.
Search is especially useful when a customer provides an item number or when you want to inspect a specific product group. Once found, expand the row to check the details.
Figure 2.4: Search bar above the product table for rapid item filtering (Source: images/item_manager_04.png)Click to enlarge
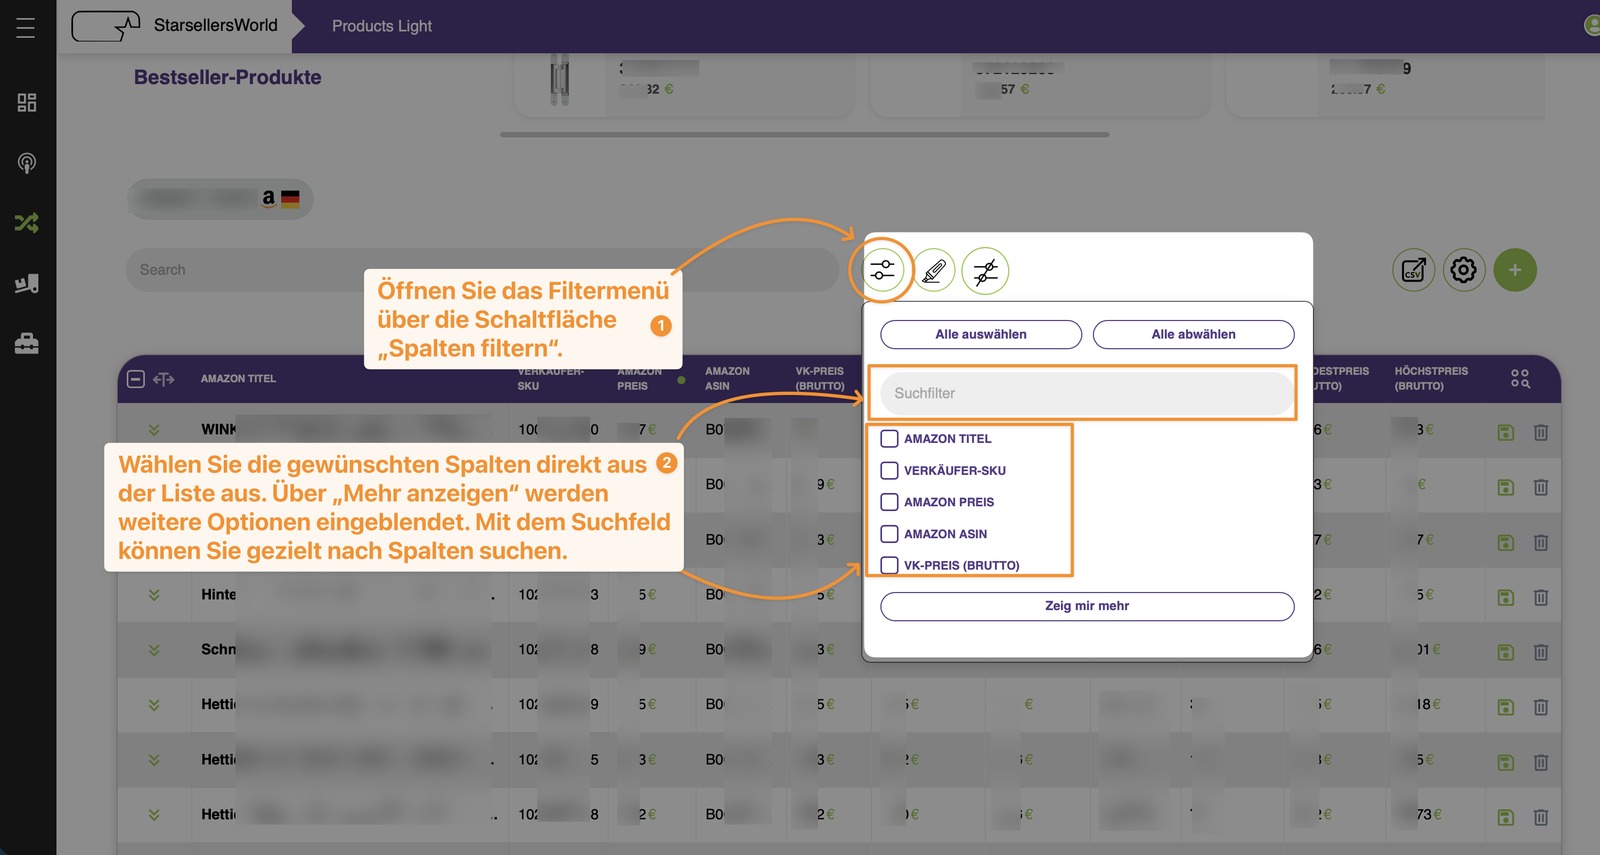
2.3.2 Column Settings
Column settings allow you to define which information is visible in the table. This is helpful when different tasks require different data fields, such as pricing fields, stock levels, competitor prices, or master data.
For daily operations, a compact view with the most important control columns is recommended. For deeper analysis, additional columns can be shown at any time without altering underlying product data.
Figure 2.5: Column filter menu for customizing visible table columns (Source: images/item_manager_05.png)Click to enlarge
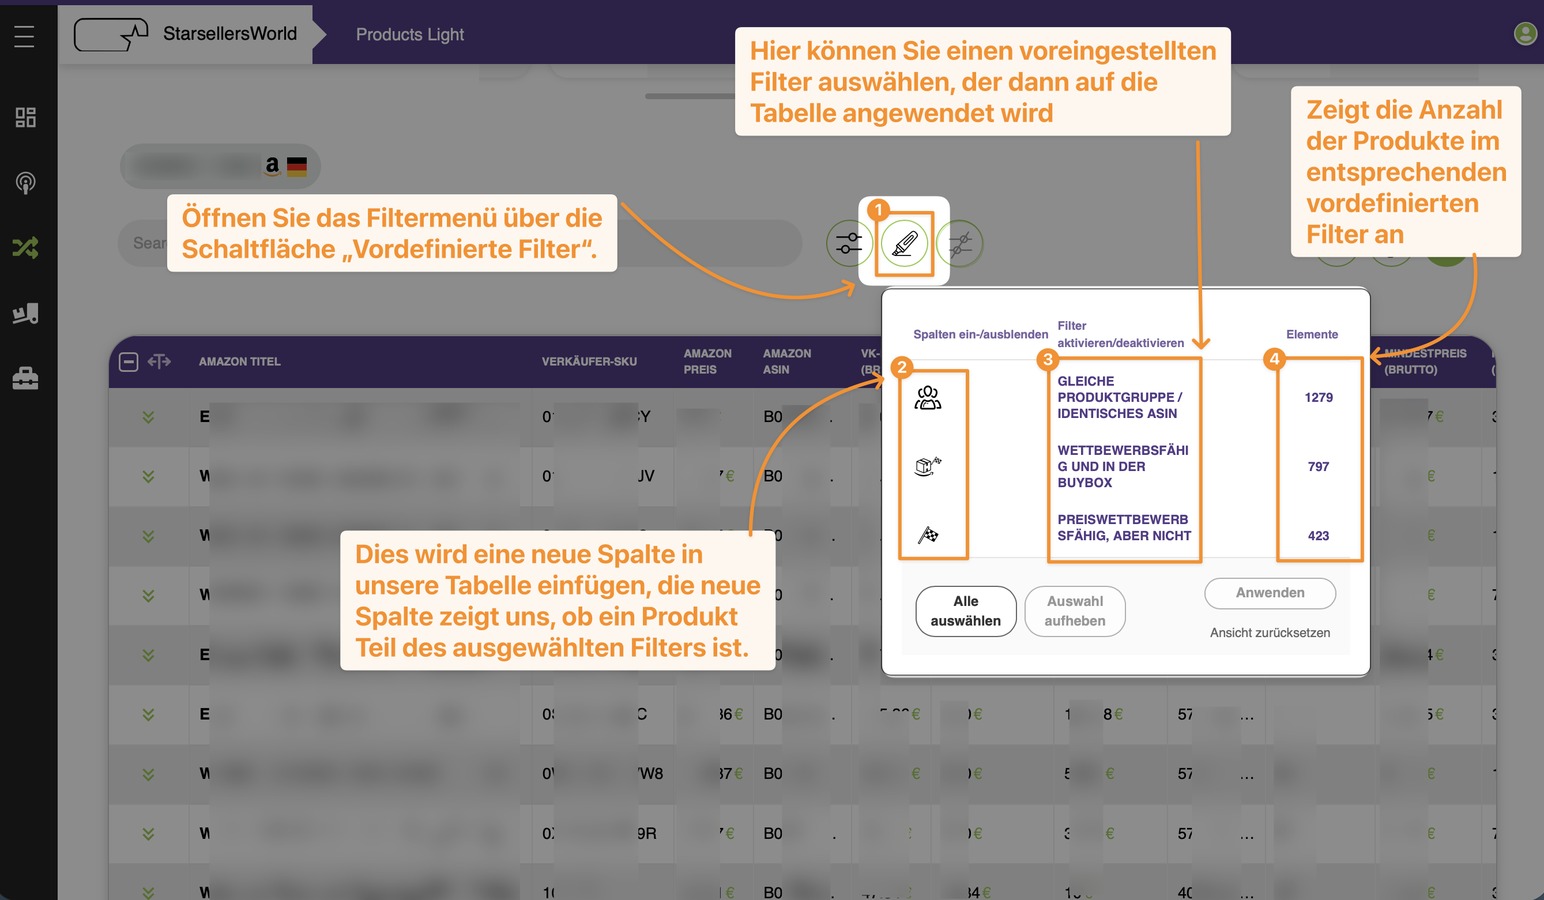
2.3.3 Predefined Filters
Predefined filters narrow down the table to common work scenarios, such as problematic items, specific status groups, or products requiring review—saving you from configuring individual filter conditions manually.
Filters are an ideal starting point for daily checks. Always verify which filter restriction is currently active so you interpret the displayed results accurately.
Figure 2.6: Predefined filters help turn large product volumes into actionable worklists (Source: images/item_manager_06.png)Click to enlarge
1
Open the filter menu via the middle Predefined Filters button (Vordefinierte Filter).
2
Show/Hide Columns (Spalten ein-/ausblenden): Inserts a new indicator column into the table showing whether a product belongs to the selected filter group.
3
Activate/Deactivate Filter (Filter aktivieren/deaktivieren): Select a preset filter (e.g., Same Product Group / Identical ASIN, Competitive and in Buy Box, or Price Competitive, but Not in Buy Box) and click Anwenden (Apply).
4
Elements (Elemente): Displays the exact number of products matching each predefined filter.
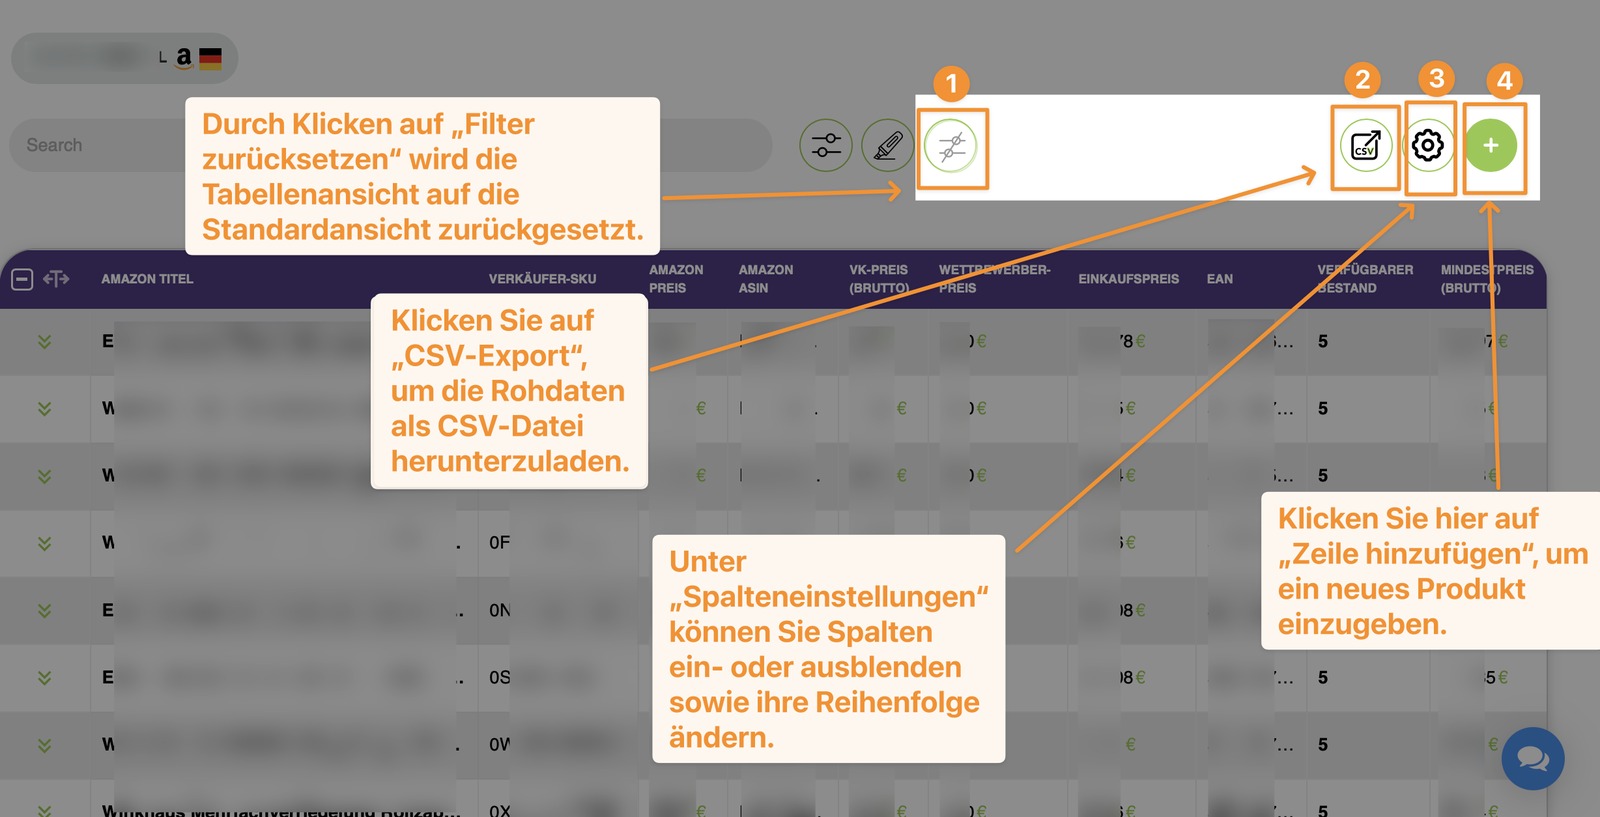
2.3.4 Table Toolbar
The toolbar on the right above the table groups essential table tools, including filter reset, CSV export, column settings, and adding new product rows.
Note: Buttons for adding or editing rows modify live data. During onboarding or training, these functions should be explained first and used deliberately.
Figure 2.7: Table toolbar with Filter Reset, CSV Export, Column Settings, and Add Row (Source: images/item_manager_07.png)Click to enlarge
1
Reset Filters: Clicking the crossed-out sliders icon resets the table view back to the default unfiltered view.
2
CSV Export (CSV): Downloads the raw table data as a CSV file.
3
Column Settings (Gear Icon): Show or hide columns and change their display order.
4
Add Row (Green + Icon): Opens a new row to manually enter a new product.
2.3.5 Product Overview Table
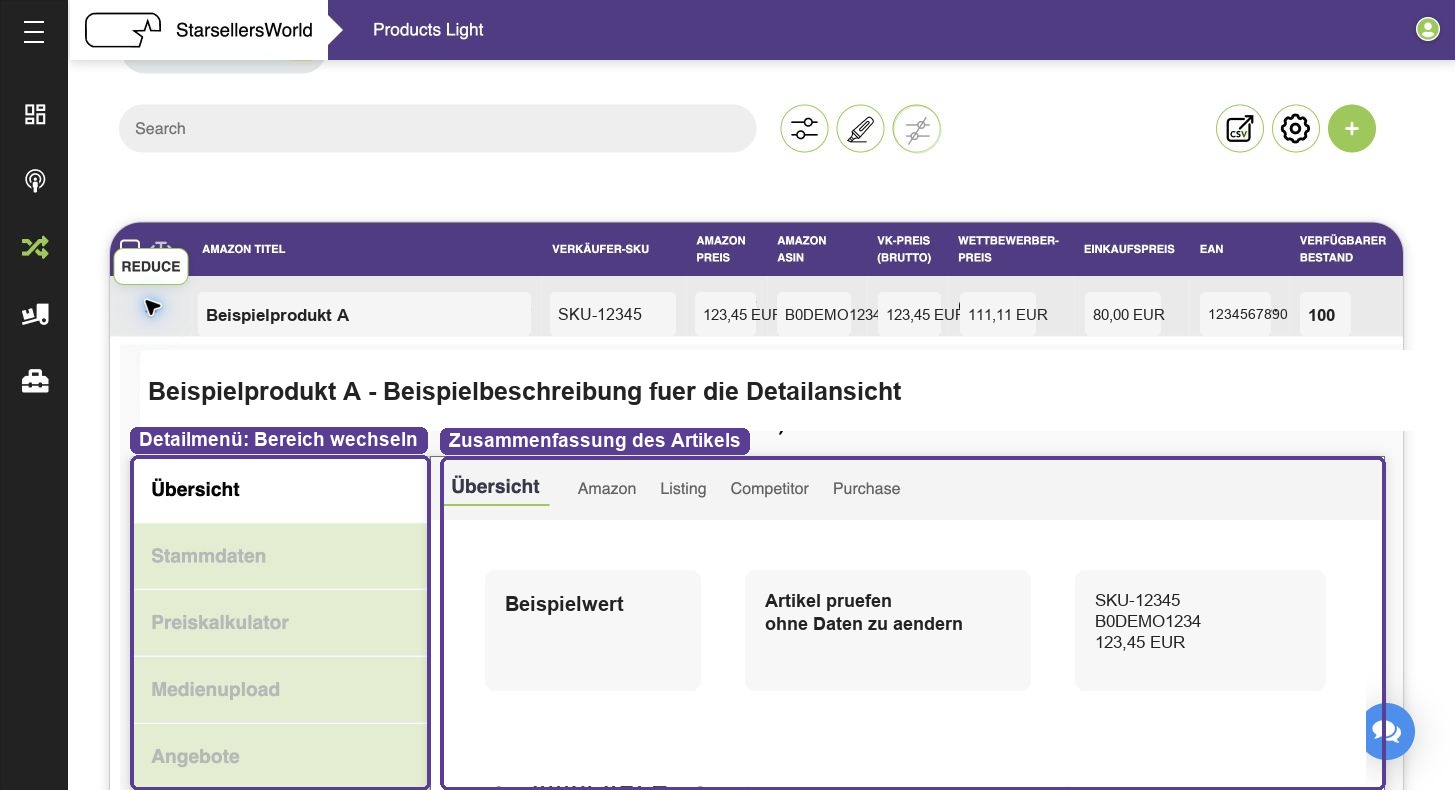
In the product overview table, you can inspect the most important metrics directly within each row. Clicking the arrow on the left of a row opens the Product Details pane, where you can see why an item stands out and review all underlying attributes.
The Product Details pane bundles all information for a single item. Use it whenever a table row requires closer inspection due to price deviations, missing attributes, media issues, or offer status.
The vertical navigation menu on the left leads to the five sub-sections. Work from top to bottom: first Overview (Übersicht), then Master Data (Stammdaten), followed by Price Calculator (Preiskalkulator), Media Upload (Medienupload), and Offers (Angebote).
Figure 2.8: Detailed view of an item with navigation areas and central information fields (Source: images/item_manager_09.png)Click to enlarge
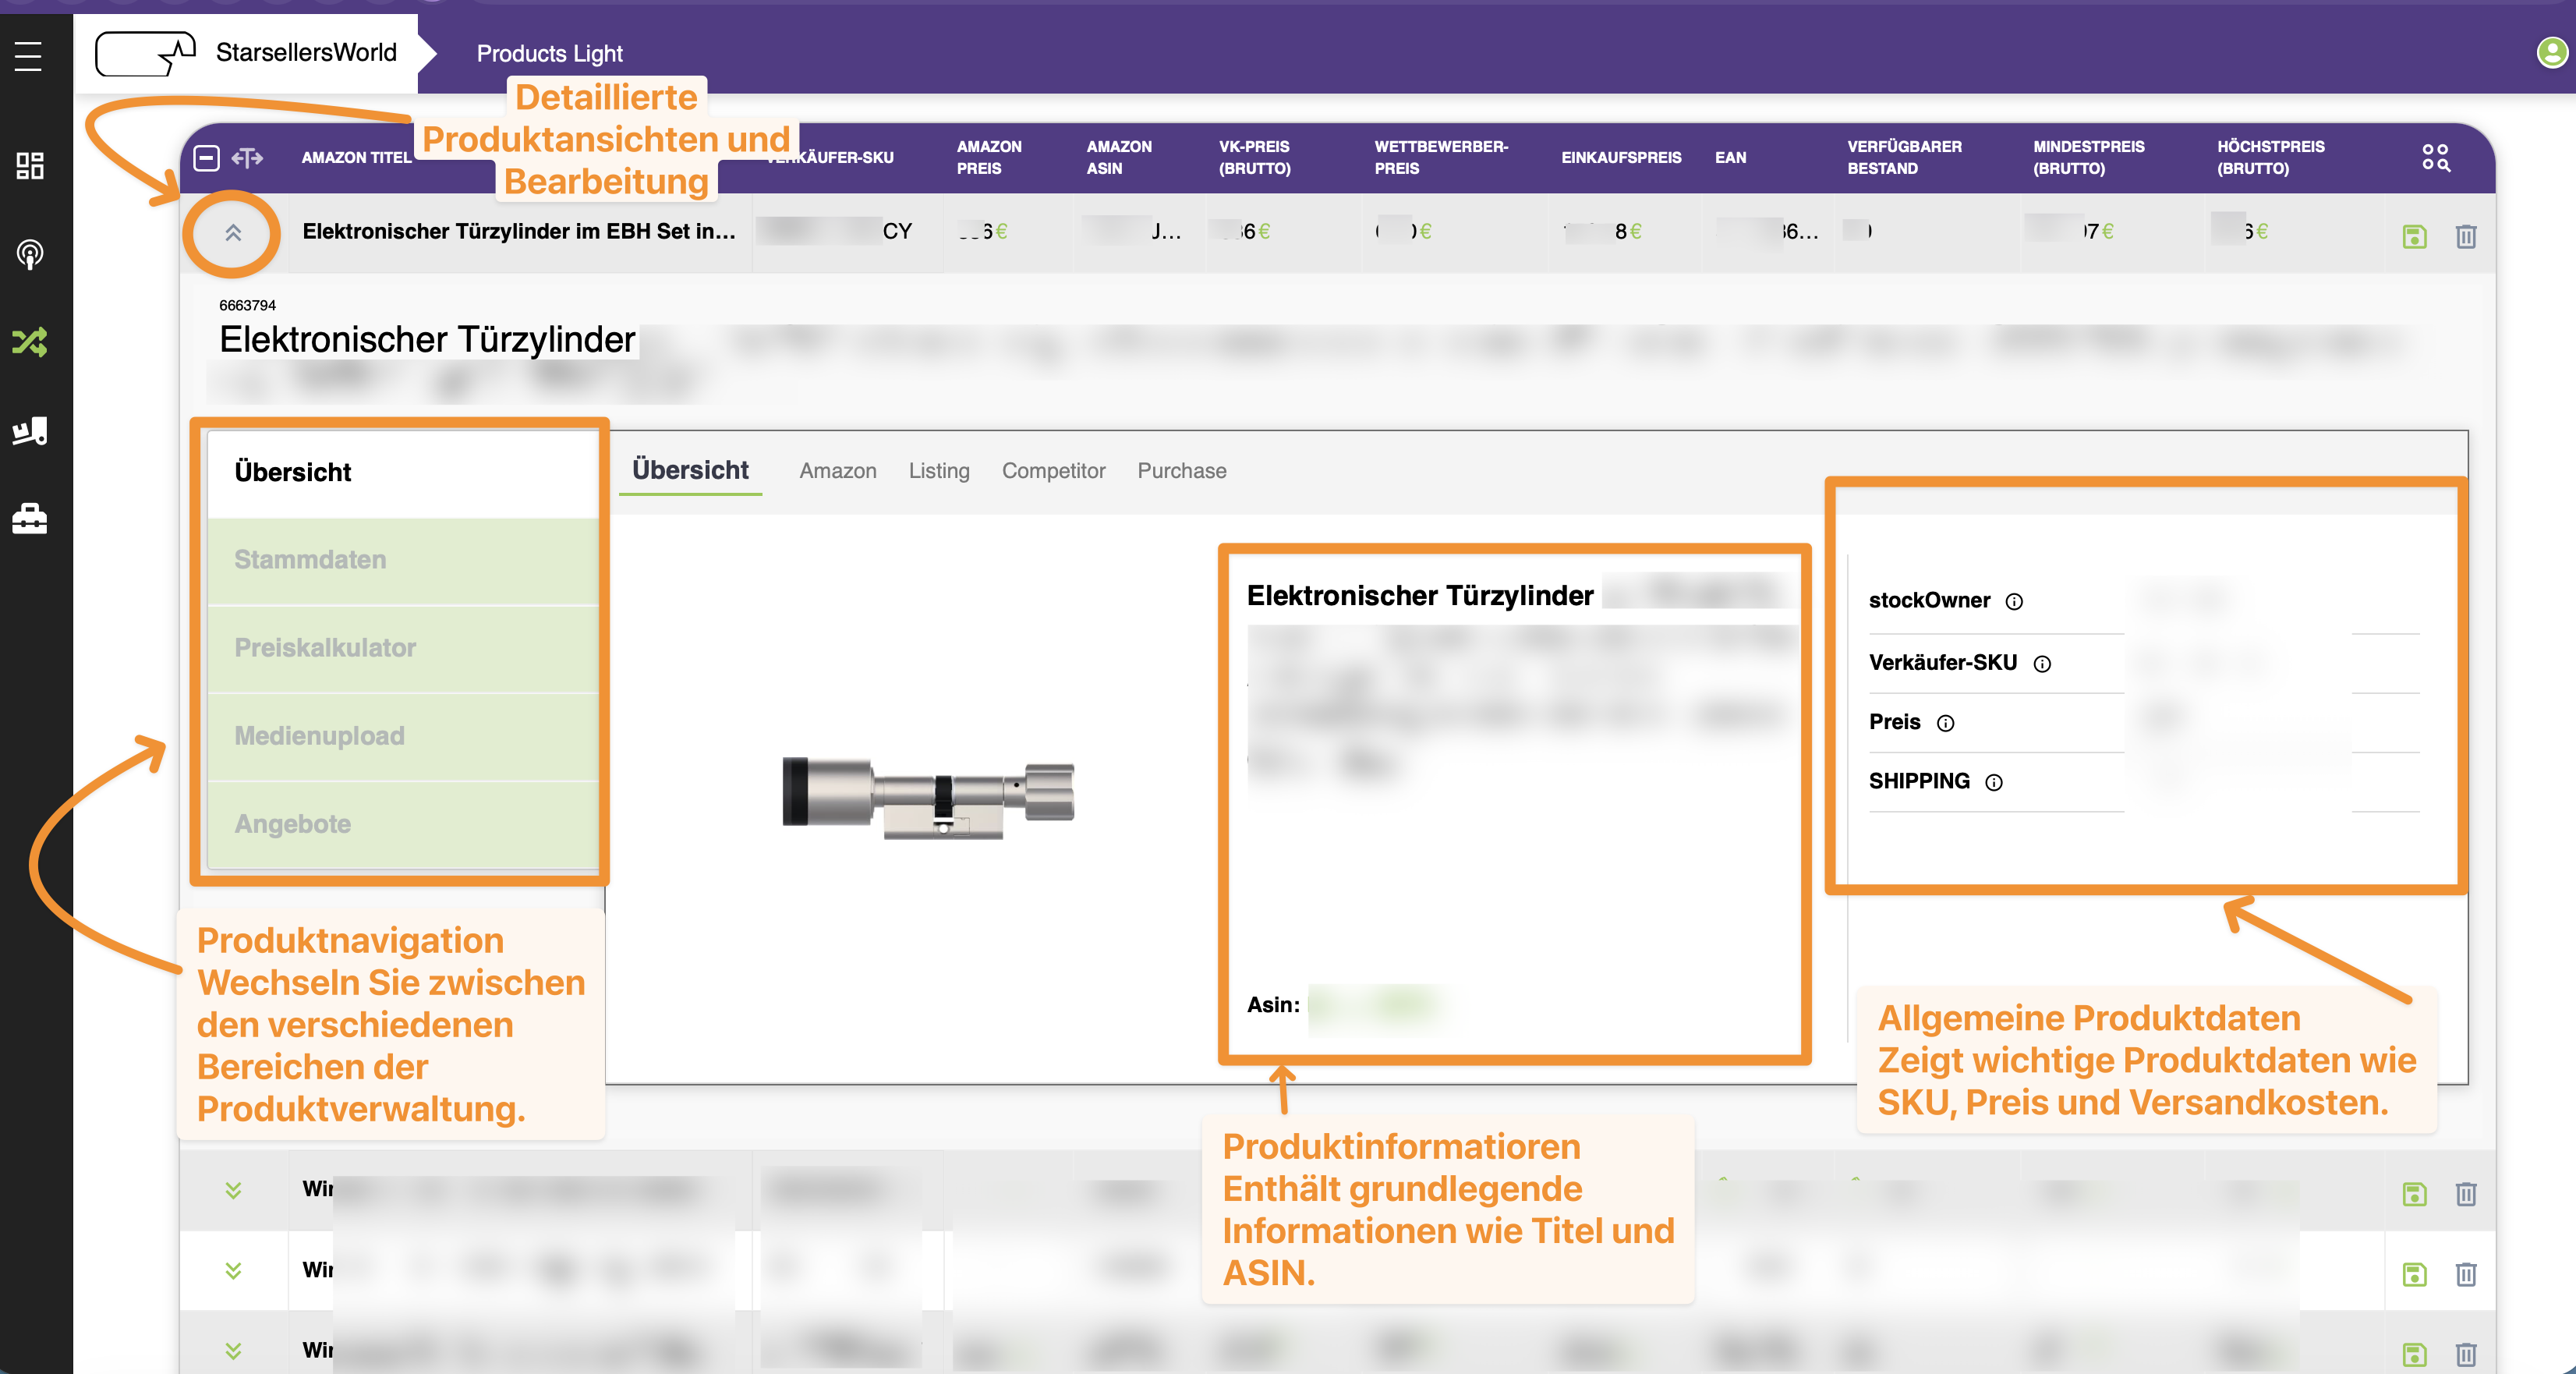
2.4.1 Overview (Übersicht)
The Overview summarizes the most important product information (with sub-tabs for Übersicht, Amazon, Listing, Competitor, and Purchase). It serves as an initial check to confirm you have opened the right item and whether core values (such as Asin, stockOwner, Verkäufer-SKU, Preis, and SHIPPING) look plausible.
From here, decide which section to inspect next: switch to the Price Calculator for pricing questions, Master Data for product attributes, or Media Upload for images and documents.
Figure 2.9: Overview tab showing product navigation, title/ASIN, and general product data (Source: images/item_manager_10.png)Click to enlarge
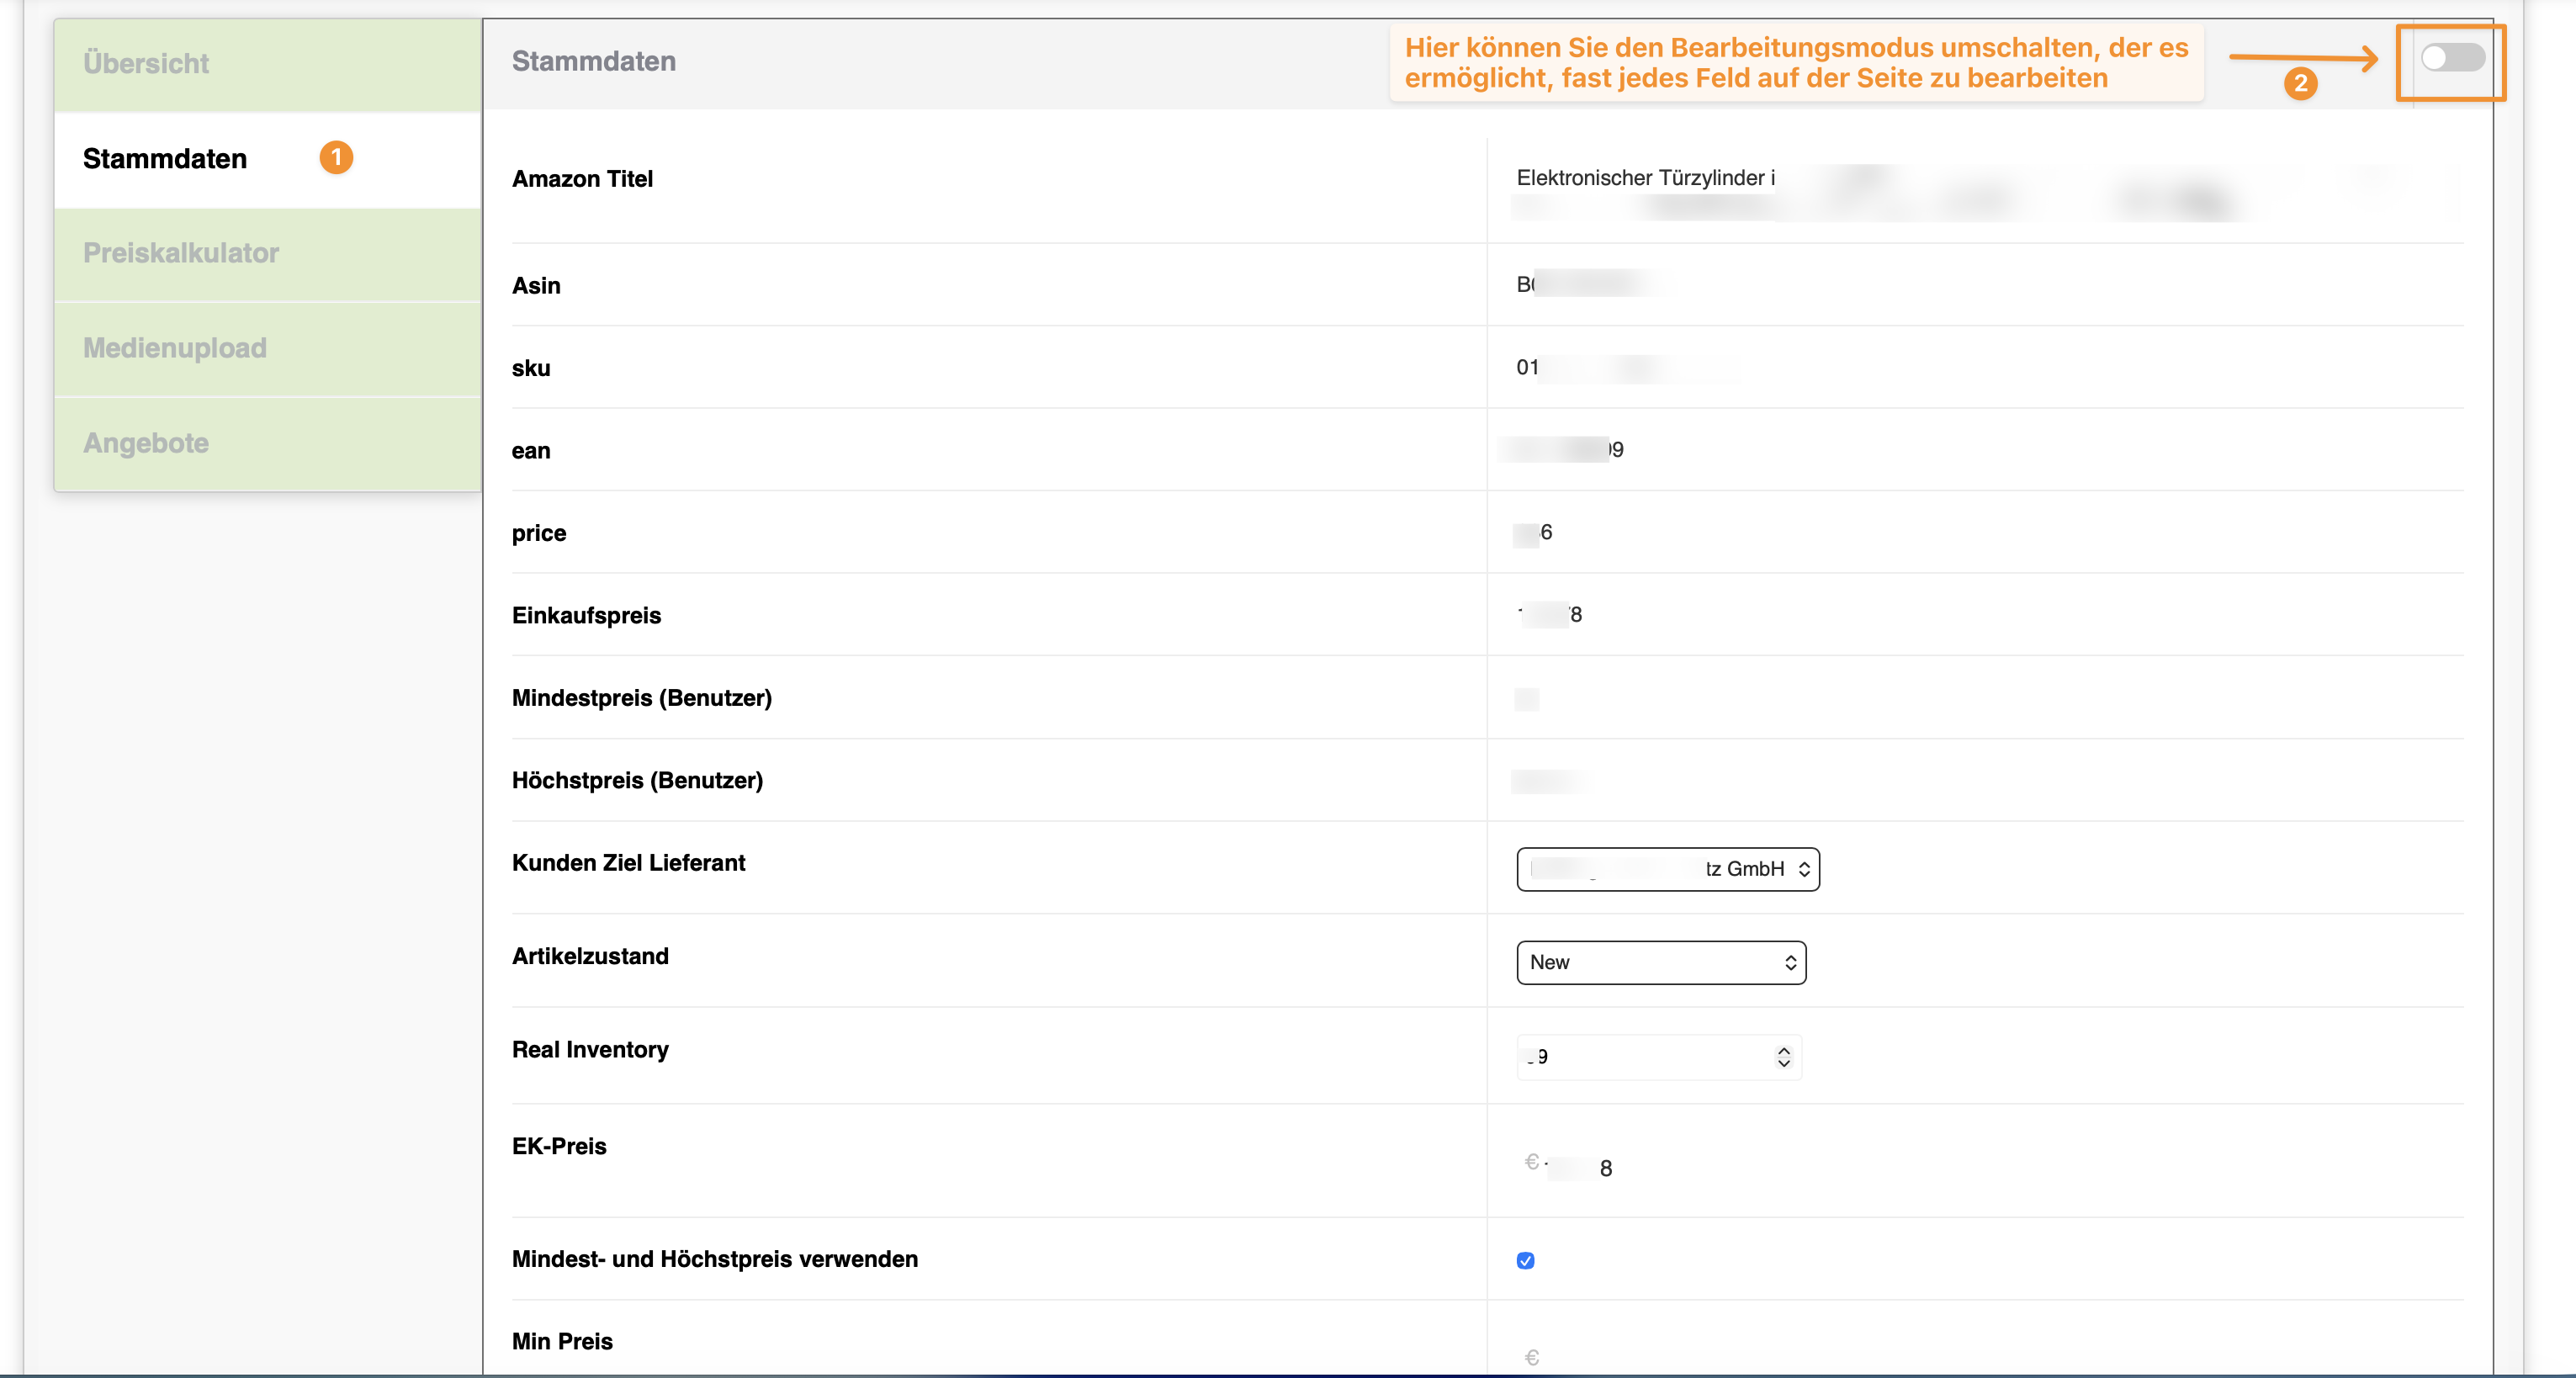
2.4.2 Master Data (Stammdaten)
Master Data contains fundamental product attributes such as title, ASIN, SKU, EAN, purchase price, user min/max prices, target supplier account, item condition, and real inventory. These attributes form the basis for listings, searchability, media assignment, and offer logic.
Edit Mode Toggle: In the top right corner of the Master Data view, you can toggle the edit mode switch to unlock and edit almost any field on the page.
Figure 2.10: Master Data section (1) with the Edit Mode toggle switch in the top right corner (2) (Source: images/item_manager_11.png)Click to enlarge
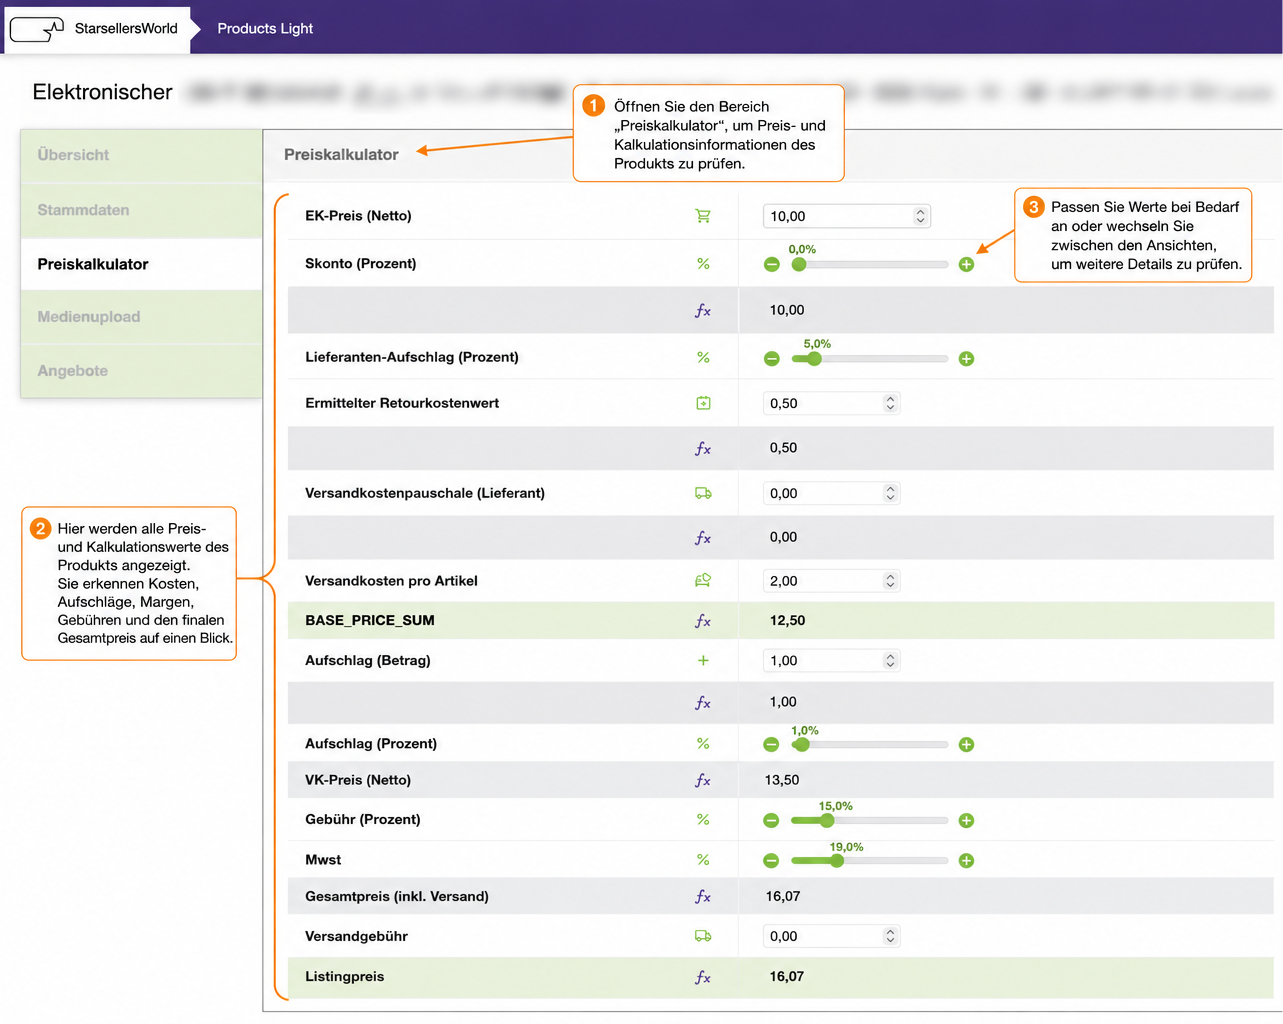
2.4.3 Price Calculator (Preiskalkulator)
The Price Calculator helps you verify sales prices, cost components, minimum/maximum boundaries, and margin calculation logic from top to bottom: starting from Net Purchase Price (EK-Preis (Netto)), Cash Discount (Skonto), Supplier Surcharge, Return Cost Value, and Shipping Costs to the intermediate BASE_PRICE_SUM, followed by custom surcharges, Net Sales Price (VK-Preis (Netto)), marketplace fee (Gebühr), VAT (Mwst), total price incl. shipping, and the final Listingpreis.
Use this area whenever an item stands out in the table due to price, margin, or competition. Changes to pricing fields should only be made following internal approval or the designated pricing workflow.
Figure 2.11: Price Calculator for inspecting cost components, surcharges, fees, and final listing price (Source: images/item_manager_12.png)Click to enlarge
2.4.4 Media Upload (Medienupload)
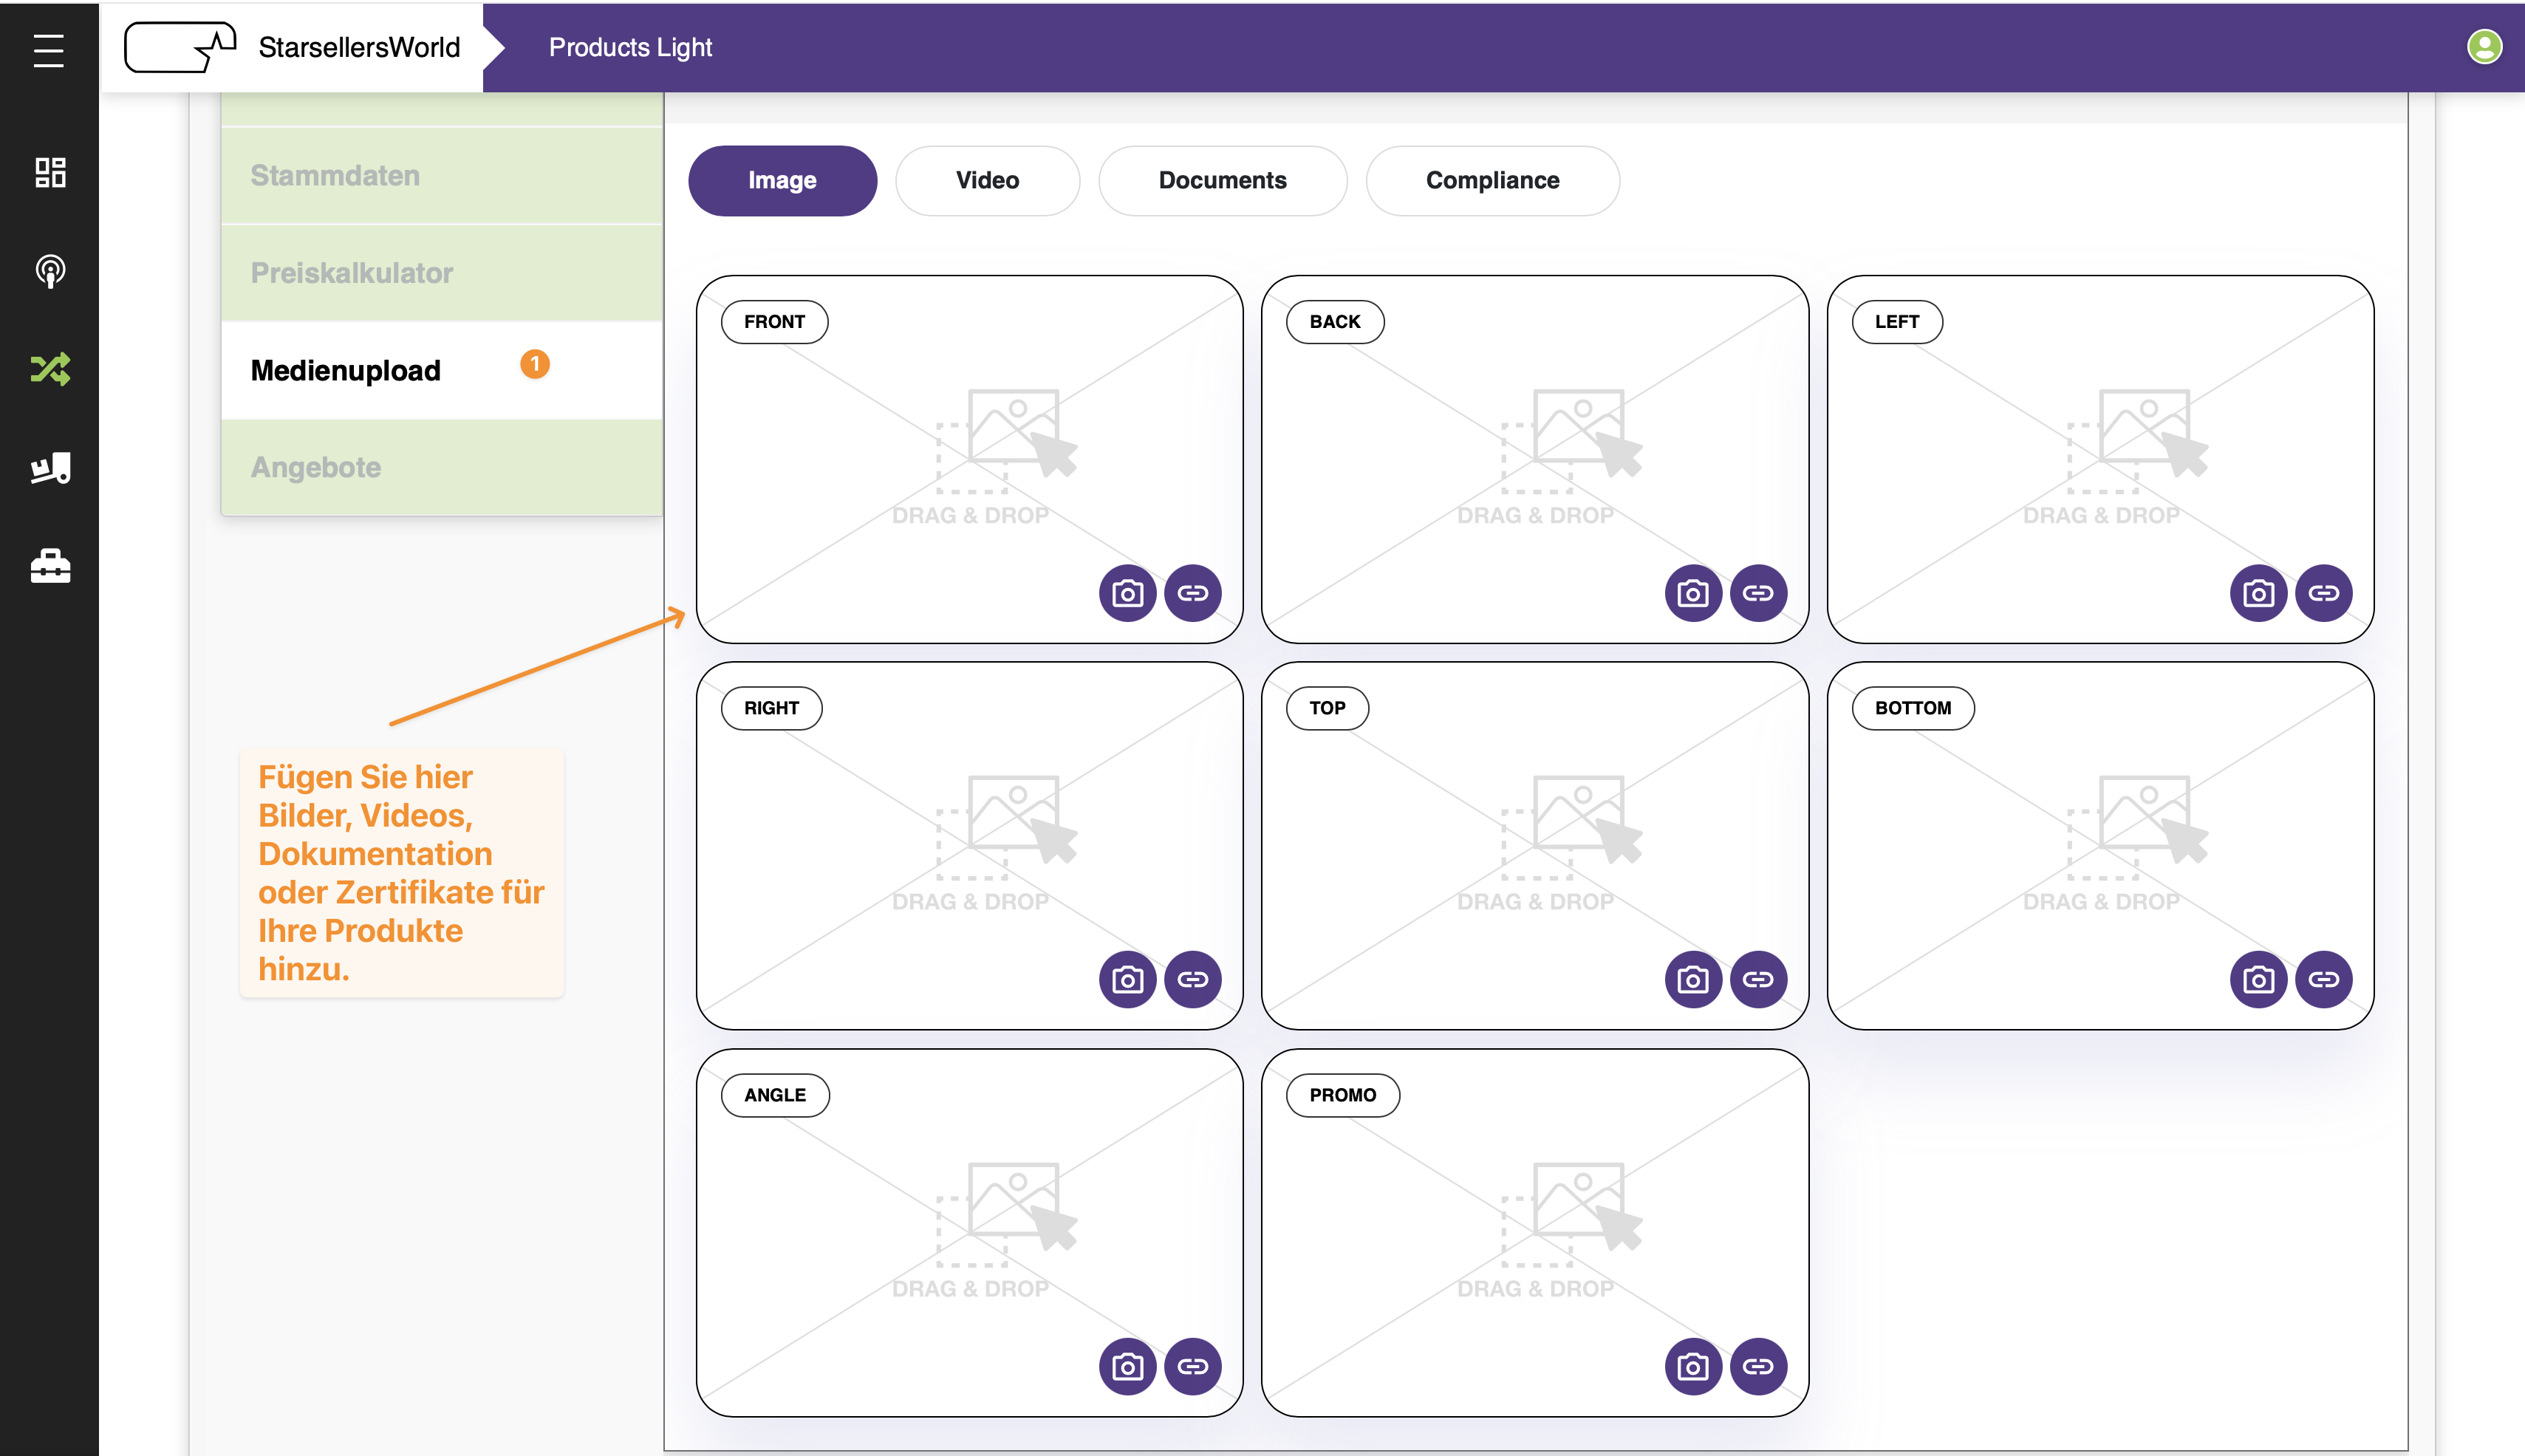
In the Media Upload section, product-related media such as images (Image), videos (Video), documentation (Documents), and certificates (Compliance) are managed across 8 defined slots (FRONT, BACK, LEFT, RIGHT, TOP, BOTTOM, ANGLE, PROMO).
Ensure that images are complete, clearly assigned, and compliant with marketplace requirements. Upload or delete actions modify content and should only be used deliberately.
Figure 2.12: Media Upload section for images, videos, documents, and compliance certificates (Source: images/item_manager_13.png)Click to enlarge
2.4.5 Offers (Angebote)
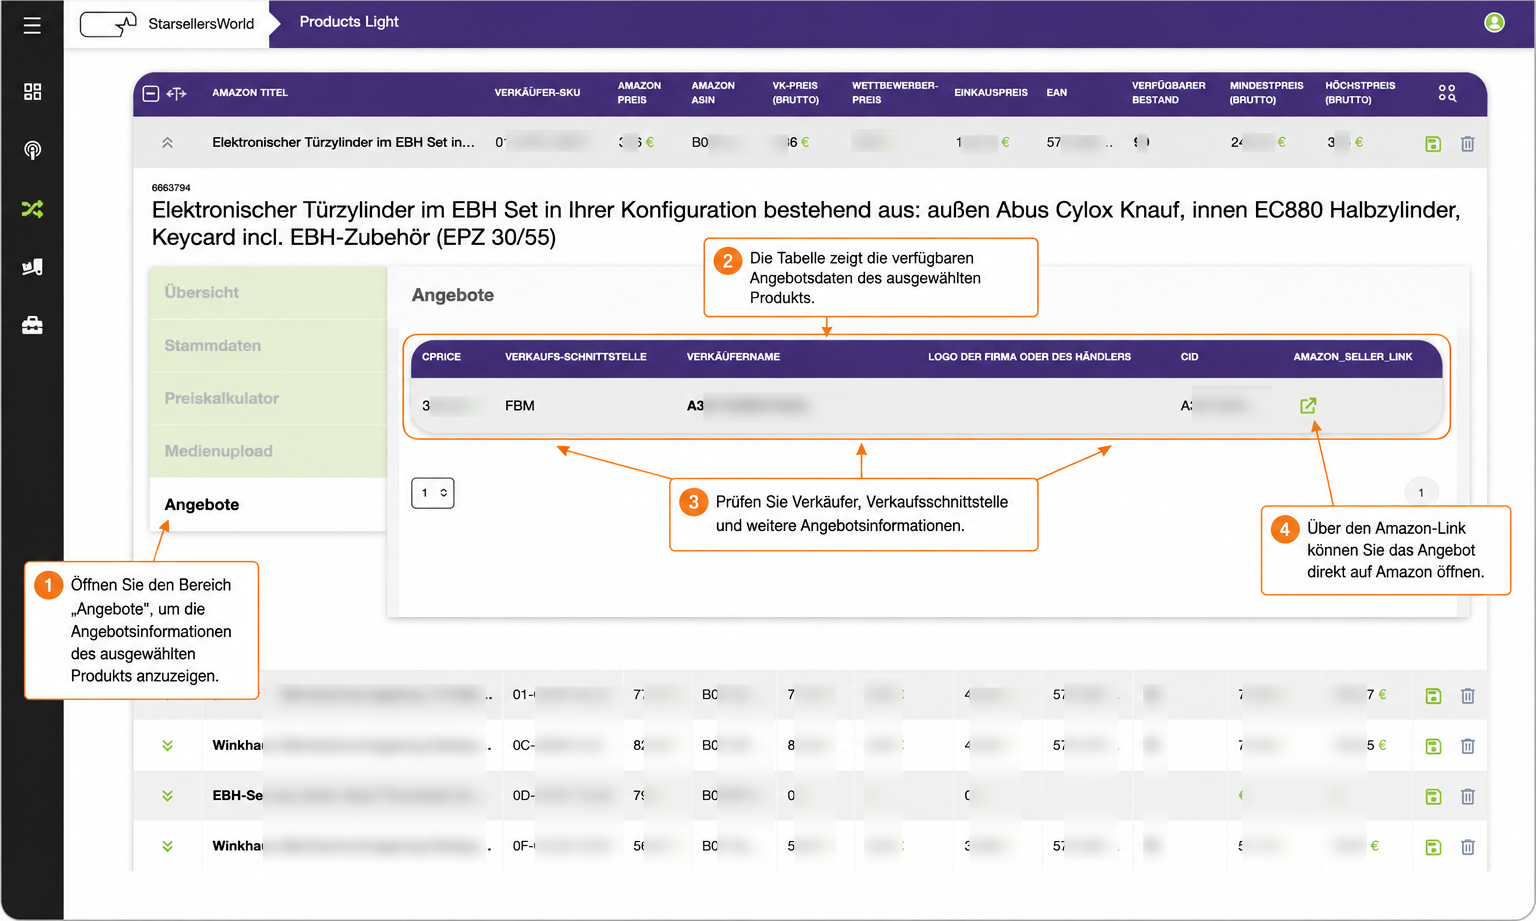
The Offers section displays marketplace-specific offer data for the selected product (CPRICE, VERKAUFS-SCHNITTSTELLE e.g. FBM, VERKÄUFERNAME, CID, and AMAZON_SELLER_LINK).
This area is especially helpful when a product does not hold the Buy Box, is not listed as expected, or when offer data needs to be cross-checked against the product table. Clicking the green external link icon under AMAZON_SELLER_LINK opens the live offer directly on Amazon.
Figure 2.13: Offers section with seller details, fulfillment channel, and direct Amazon link (Source: images/item_manager_14.png)Click to enlarge
Start on the Dashboard. Then use Bestsellers, Search, or Predefined Filters to inspect specific products in the table.
What is the difference between the product table and the detailed view?
The table compares many products side by side. The detailed view (expanded via the arrow on the left of a row) shows all in-depth information for a single product.
When should I use column settings?
Whenever the table shows too much or too little information. Enable only the columns that are relevant to your current task.
Are the metrics on the dashboard an official report?
No. They serve for quick orientation. For official evaluations, always use the designated reporting processes.
What should I keep in mind regarding action buttons?
Buttons for saving, uploading, adding, or deleting items can alter live data. Only use them when you intentionally want to perform that step.
3. Data Import (File Import) – Seller View
Quick Guide for Import Sets, Data Sources, Column Mappings & Schedules • Version 1.0
The Data Import area (also referred to as File Import, located under Purchasing → Data Import / Einkauf → Daten-Import) is the central interface in Products Light for feeding product data, stock levels, purchase prices, and offer information into the system—either automatically on a schedule or manually. Through so-called Import Sets, you define where the data originates, how file columns are mapped to system fields, and according to which schedule processing takes place.
For daily quality control, users typically work in three steps: first check the current status and recent executions in the import table, then manually provide a file or check the schedule if needed, and finally—if structural adjustments are required—open the detailed configuration of an Import Set.
Important Safety Warning: Actions such as manually triggering an import (RUN NOW), deleting a set (TRASH), or changing the import intent (e.g., DELETION_IMPORT) can immediately modify or remove live data in the product catalog. Only perform such changes after prior verification.
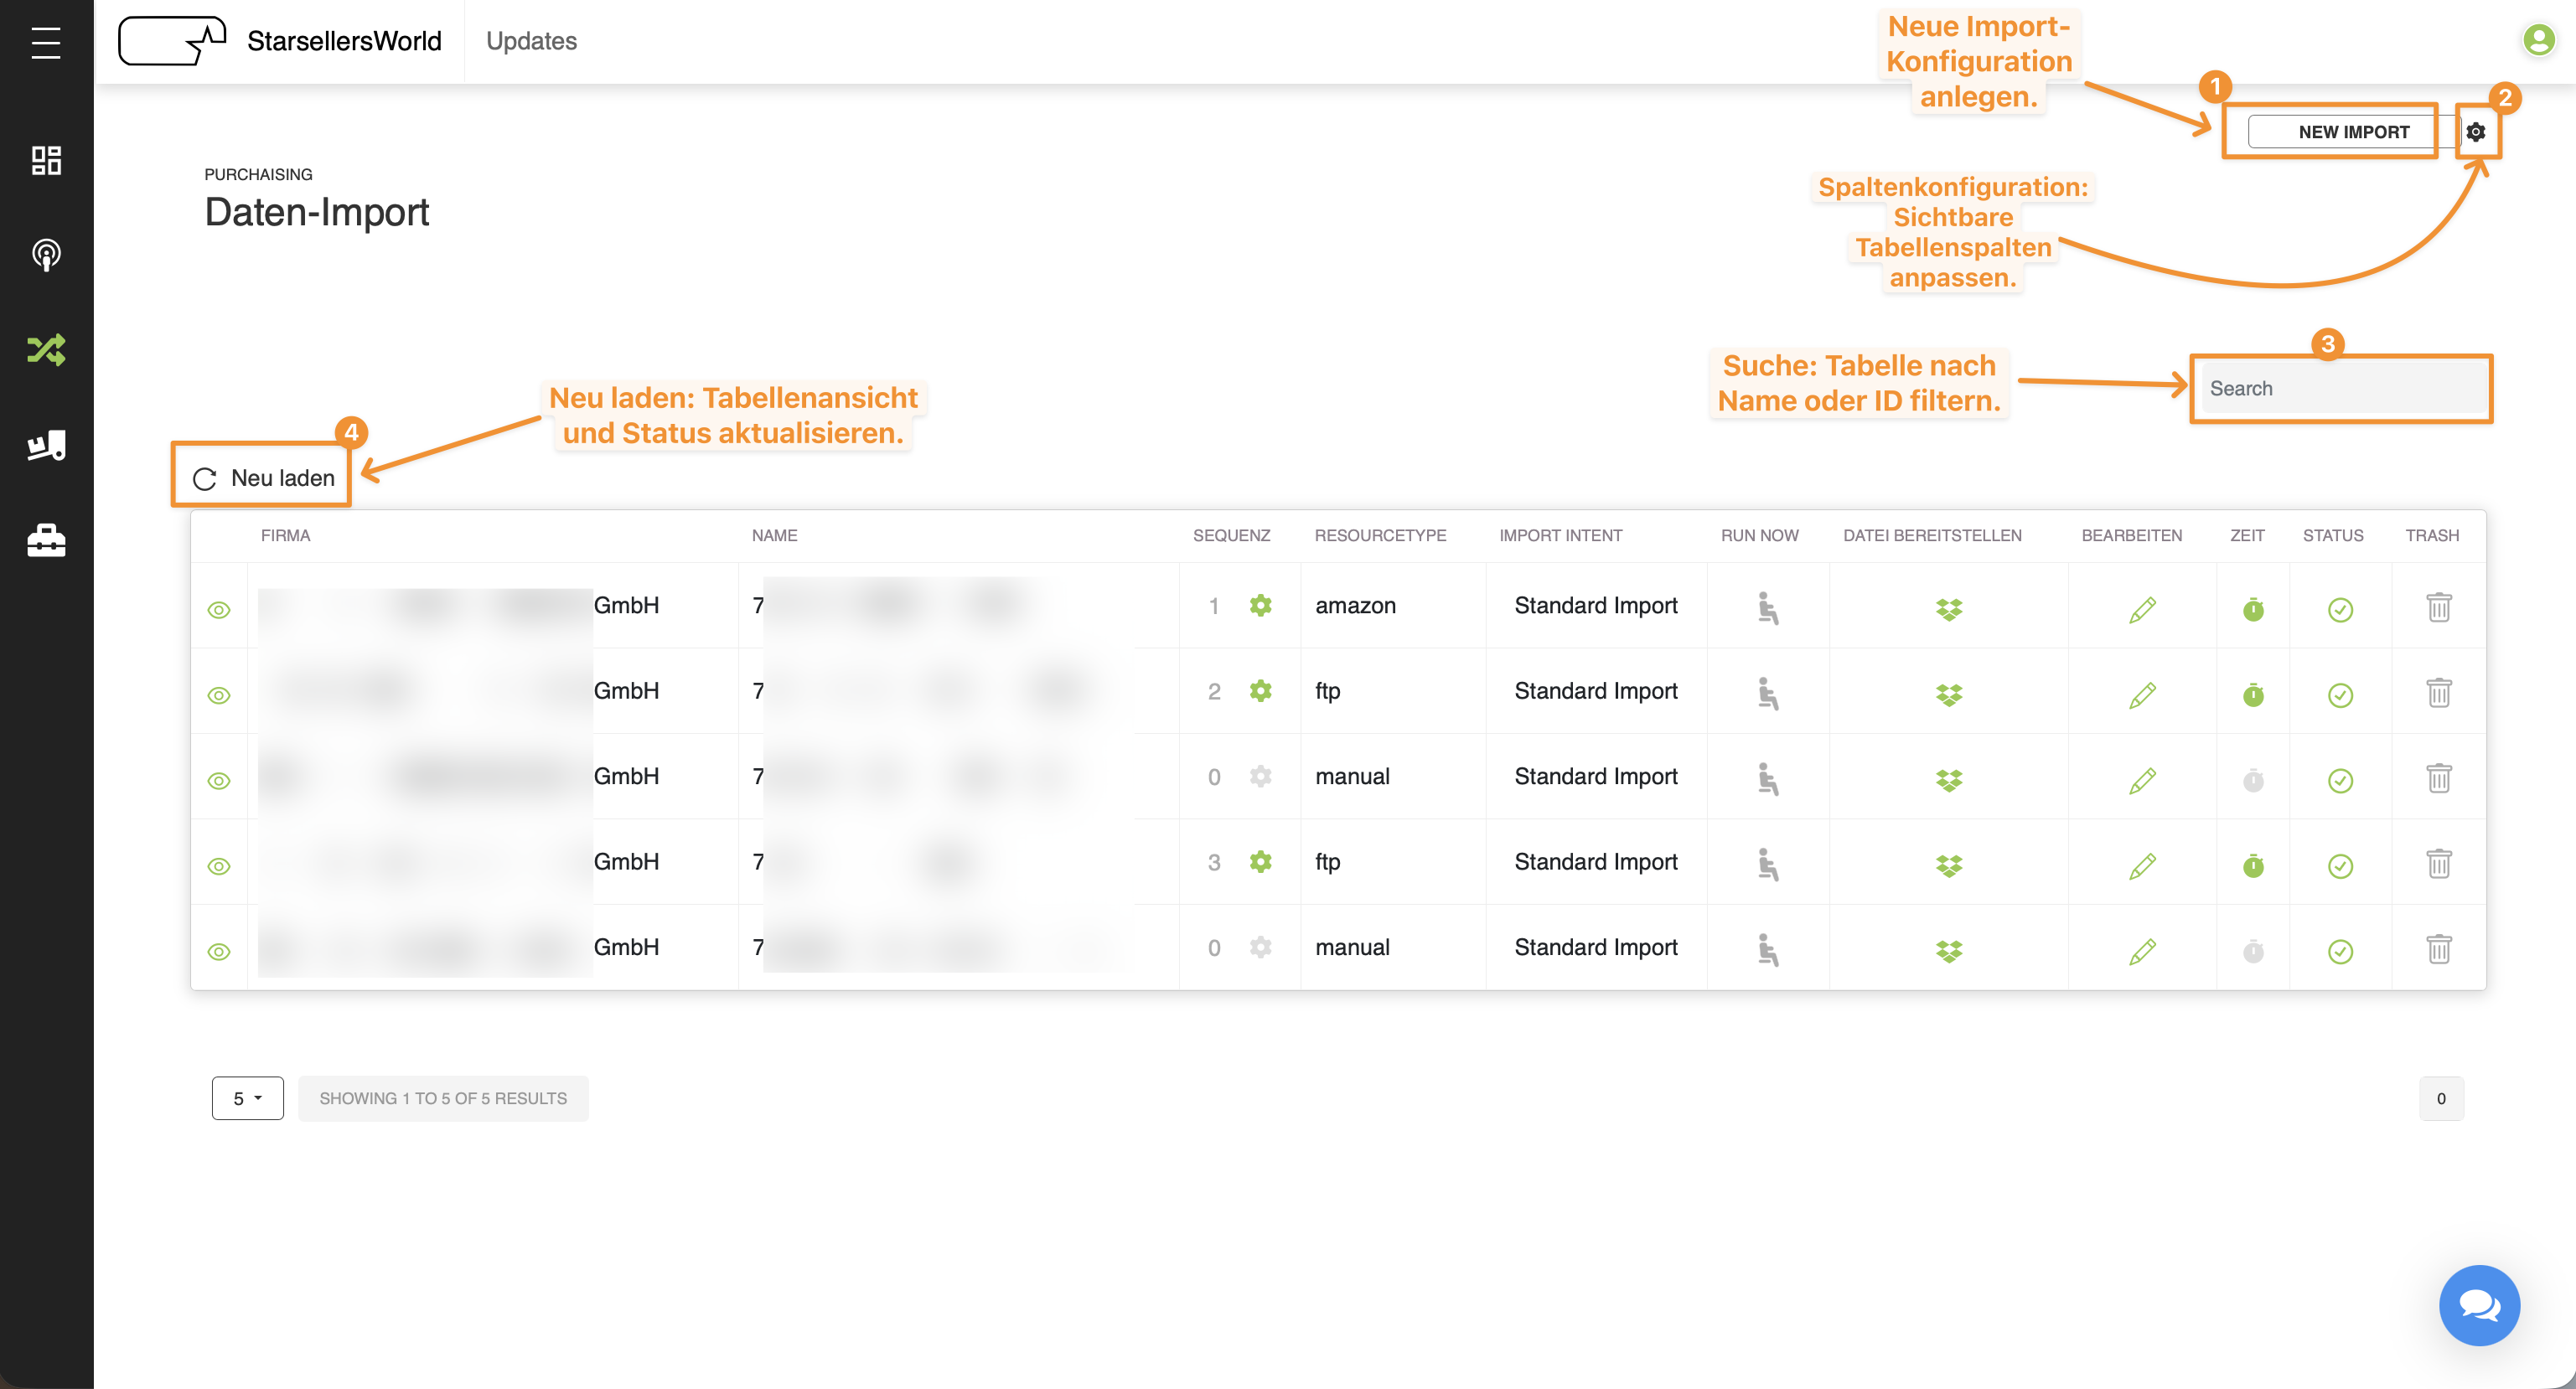
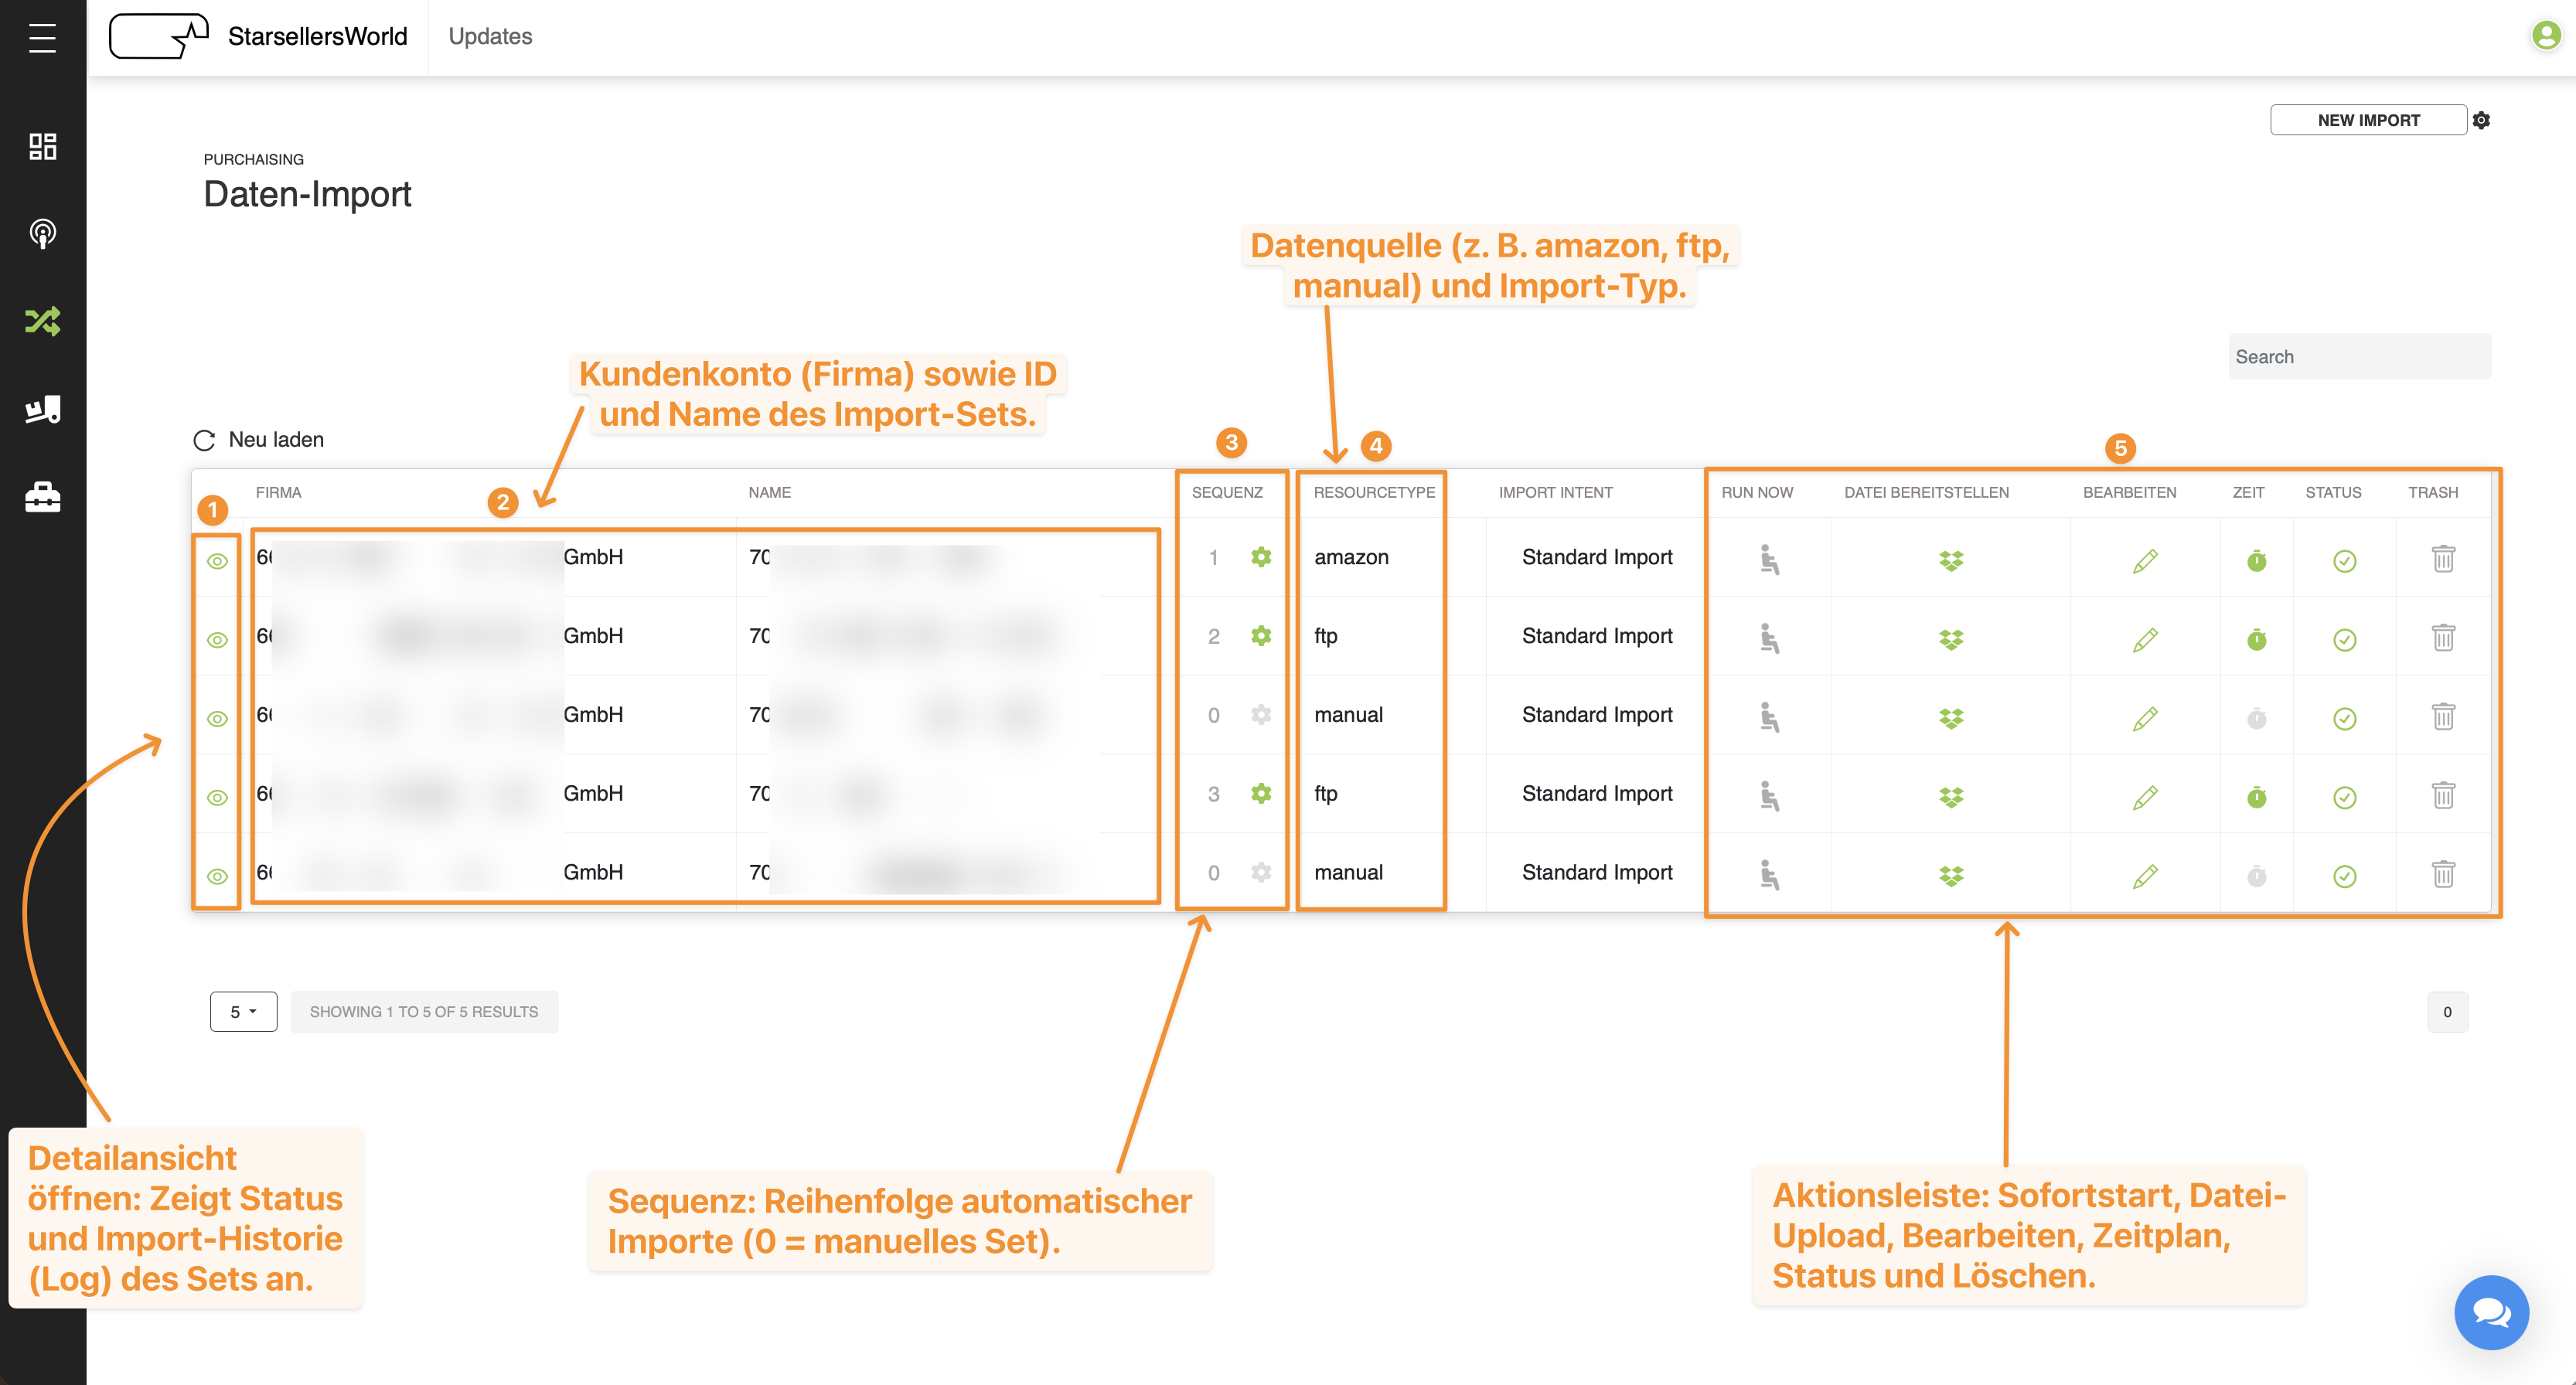
The main view under Purchasing → Data Import displays all configured Import Sets for the selected customer account in an overview table. Each row represents an individual import configuration with its respective data source, priority sequence, and control functions.
Figure 3.1: Overview table in the Data Import area with active and manual Import Sets (Source: images/data_import_01.png)Click to enlarge
1
Open Detailed View (Eye Icon): Expands the row in read-only mode to inspect the current processing status and the history of recent import runs (Import Log).
2
COMPANY & NAME (FIRMA & NAME): Displays the assigned customer ID and company name as well as the unique ID and name of the respective Import Set.
3
SEQUENCE (SEQUENZ): Indicates the execution order (priority) of automatic imports (e.g., 1, 2, 3). A green gear icon signals an active automatic set; the value 0 with a gray gear icon stands for purely manual Import Sets.
4
RESOURCETYPE & IMPORT INTENT: Shows the configured data source (e.g., amazon, ftp, manual) and the purpose of the import (by default Standard Import).
5
Action Icons (Right Table Side): Groups the direct control functions for immediate start, file upload, editing, scheduling, status, and deletion.
3.2.1 Search Function, Refresh, and Column Configuration
Above the import table, tools are available to quickly narrow down the list when many Import Sets exist, refresh the current processing status, or customize visible table columns.
Figure 3.2: Tools above the import table for creating sets, configuring columns, searching, and refreshing (Source: images/data_import_02.png)Click to enlarge
1
NEW IMPORT: Opens the input form to create a new import configuration.
2
Column Configuration (Gear Icon): Opens the Columns configurations window. Here, columns such as CSV_ID, UsrID, Firma, Name, last_edited, active, priority (Sequence), resourcetype, import_intent, stats, run now, drop file, edit, time, status, or trash can be managed between Selected Columns and Unselected Columns.
3
Search: Filters the table in real time by the name or ID of an Import Set.
4
Reload (Neu laden): Refreshes the table view and status indicators without reloading the entire browser page.
3.2.2 Action Bar of the Import Sets
On the right side of each table row, six action columns control the Import Set in daily operations:
Column / Icon
Meaning and Function
RUN NOW
Starts the import process for this set immediately outside the regular schedule. A green icon indicates a set ready for execution; a gray icon indicates inactive or purely manual sets.
DATEI BEREITSTELLEN(Provide File)
Opens the upload dialog (Upload file) to manually upload an import file from your local computer.
BEARBEITEN(Edit)
Opens the full configuration view (pencil icon) to adjust data source, column mappings, or intelligent rules.
ZEIT(Time)
Opens the schedule planner (clock icon) for automatic imports. For manual imports (SEQUENZ 0), this icon is grayed out and disabled.
STATUS
Indicates whether the Import Set is active and configured without errors (green checkmark).
TRASH
Deletes the respective Import Set (trash can icon). Only use this function after explicit approval.
3.2.3 Detailed View and Import History (Import Log)
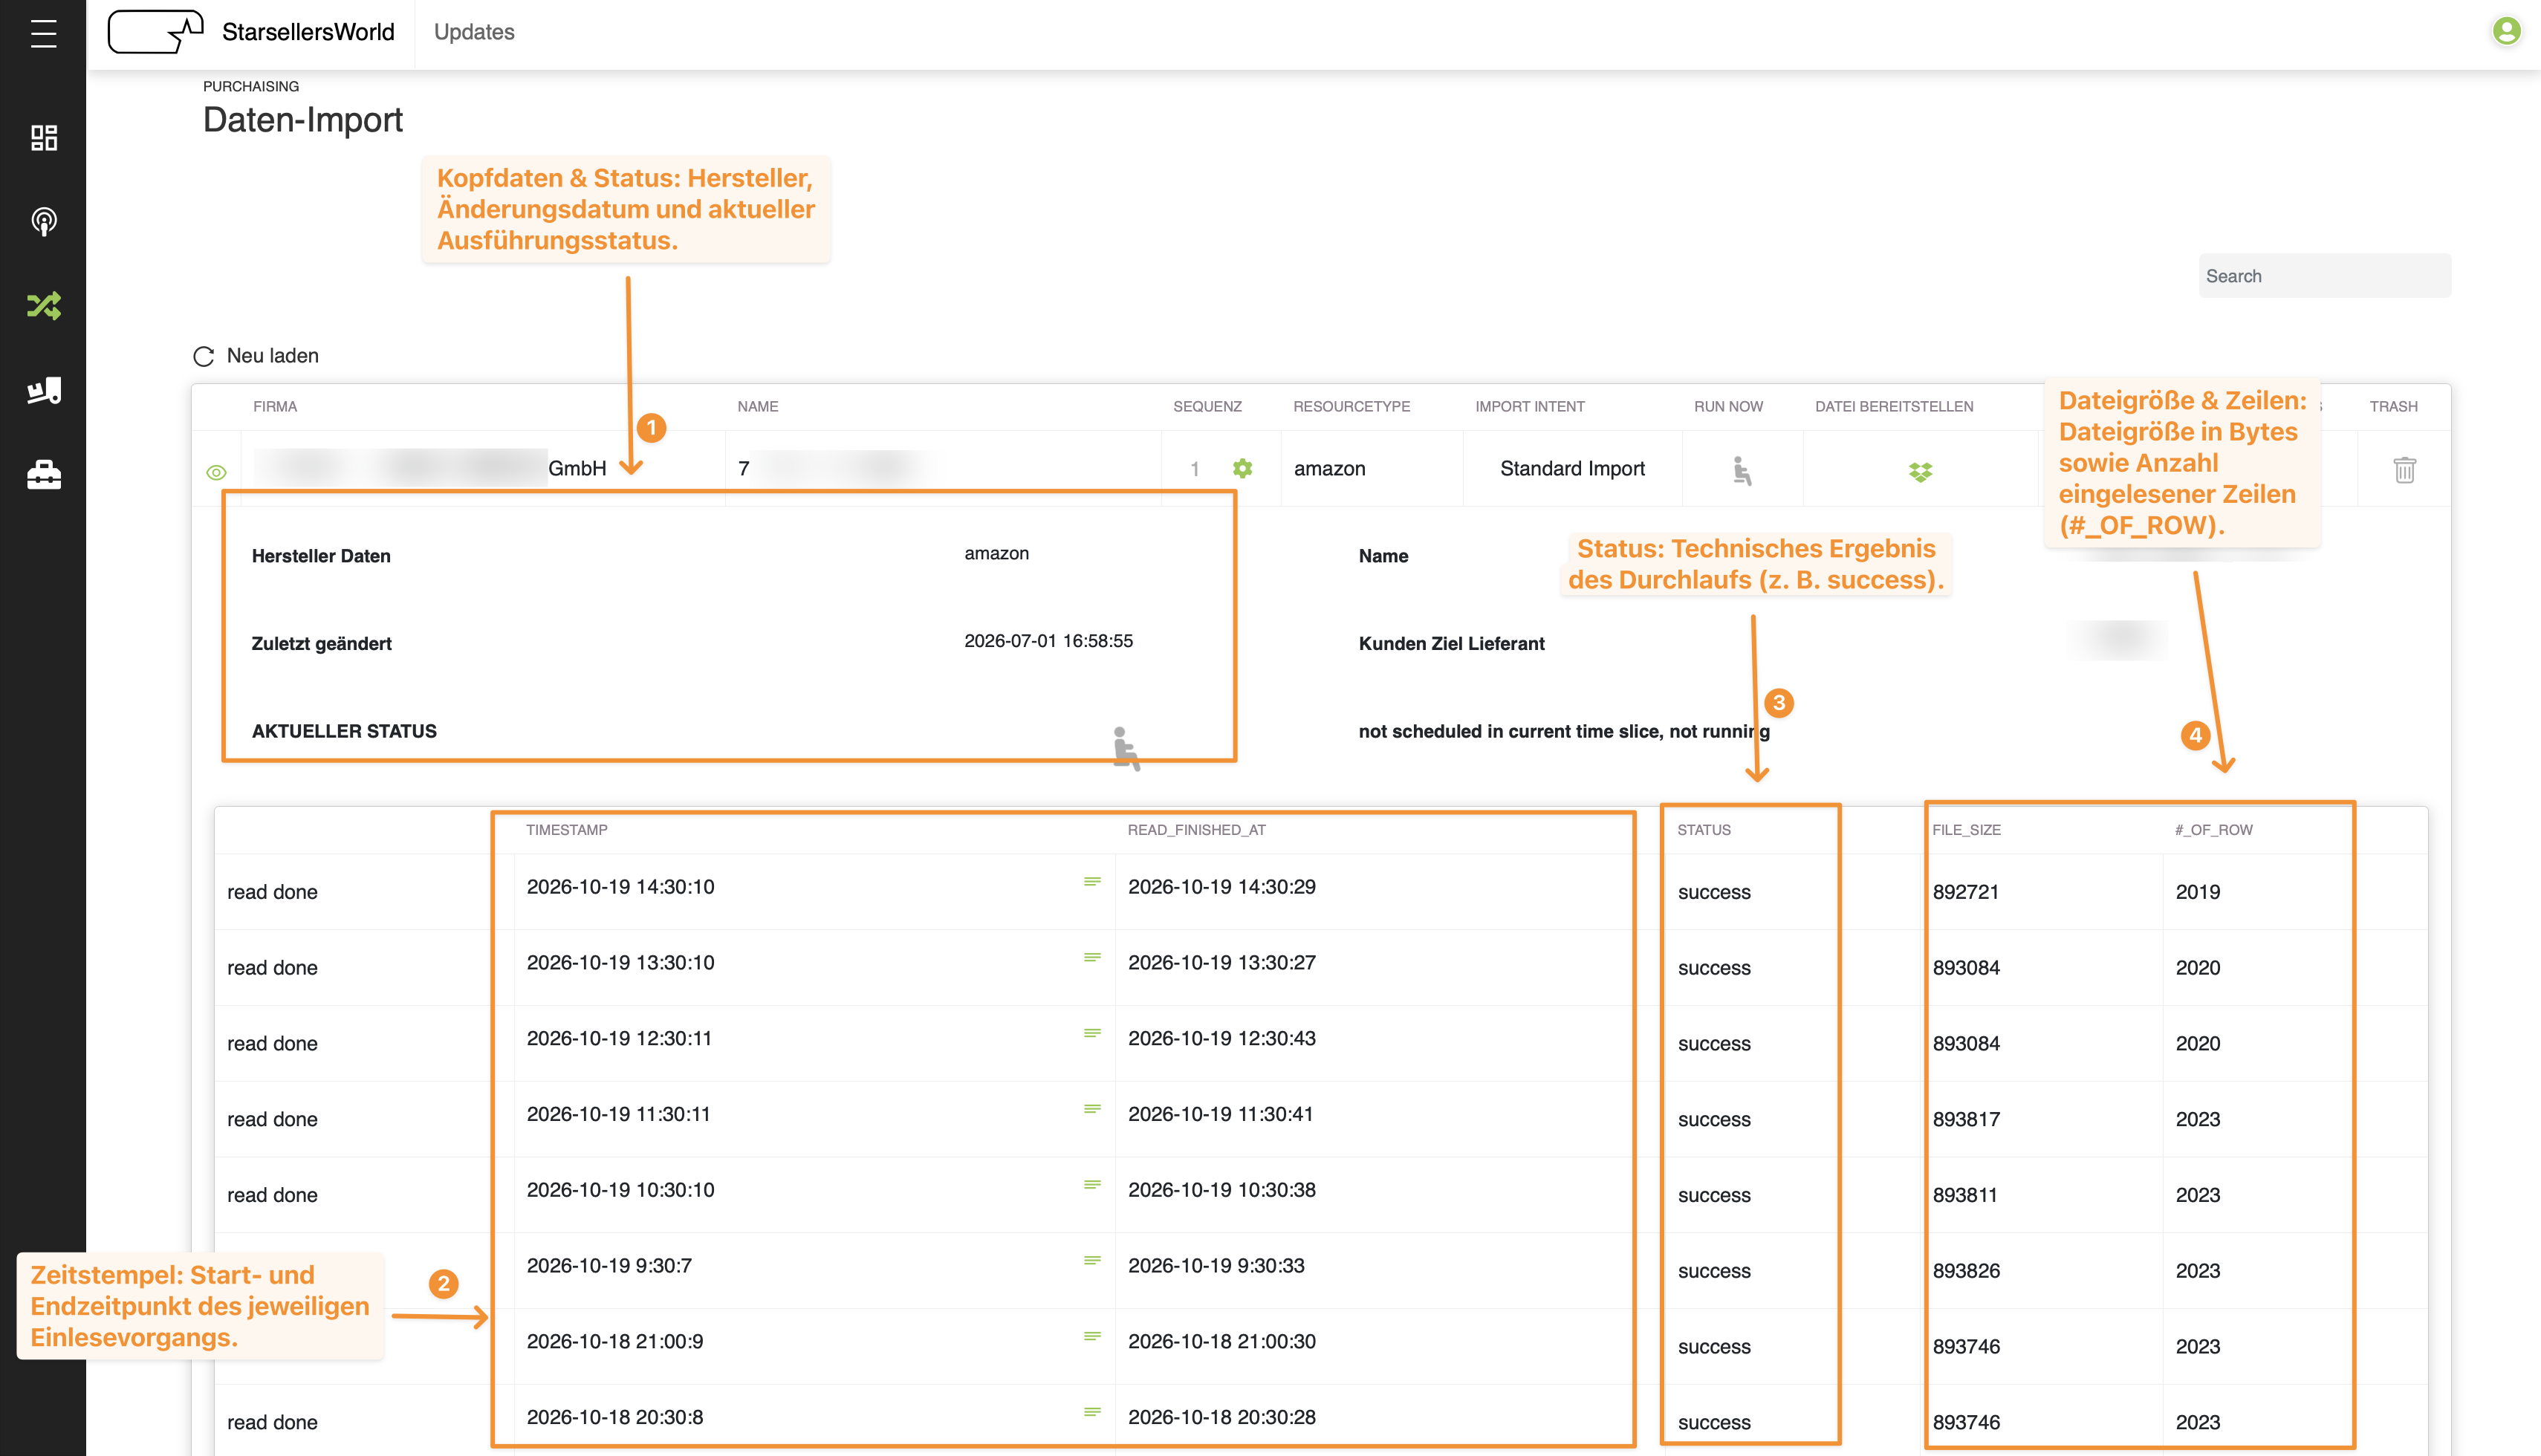
Clicking the green eye icon on the left edge of a row opens the detailed view directly below the Import Set. This area is used for daily quality control: you immediately see when the set was last modified, what the current execution status is, and whether recent import runs were successful.
Figure 3.3: Expanded detailed view of an Import Set with current status and execution history (Source: images/data_import_03.png)Click to enlarge
1
Header Data & CURRENT STATUS (AKTUELLER STATUS): Shows Manufacturer Data (Hersteller Daten, e.g., amazon), Name, Last Modified (Zuletzt geändert), and Target Supplier Account (Kunden Ziel Lieferant). Under AKTUELLER STATUS, it reports whether the scheduled run is finished (e.g., scheduled for this time slice and done or not scheduled in current time slice, not running).
2
TIMESTAMP & READ_FINISHED_AT: Documents the exact start and end timestamp of each individual read operation (read done).
3
STATUS: Shows the technical result of the run (e.g., success for error-free processing).
4
FILE_SIZE & #_OF_ROW: Indicates the file size (in bytes) as well as the number of imported rows (#_OF_ROW).
Troubleshooting Tip: Whenever discrepancies appear in the product catalog, always check the #_OF_ROW column first. If this value drops sharply compared to previous runs or stands at 0, the provided source file was likely empty or incomplete—even if the technical STATUS shows success.
In regular daily operations, existing configurations rarely need to be changed. The most frequent tasks consist of manually uploading current supplier files or checking automatic execution times.
3.3.1 Manually Provide a File (Upload file)
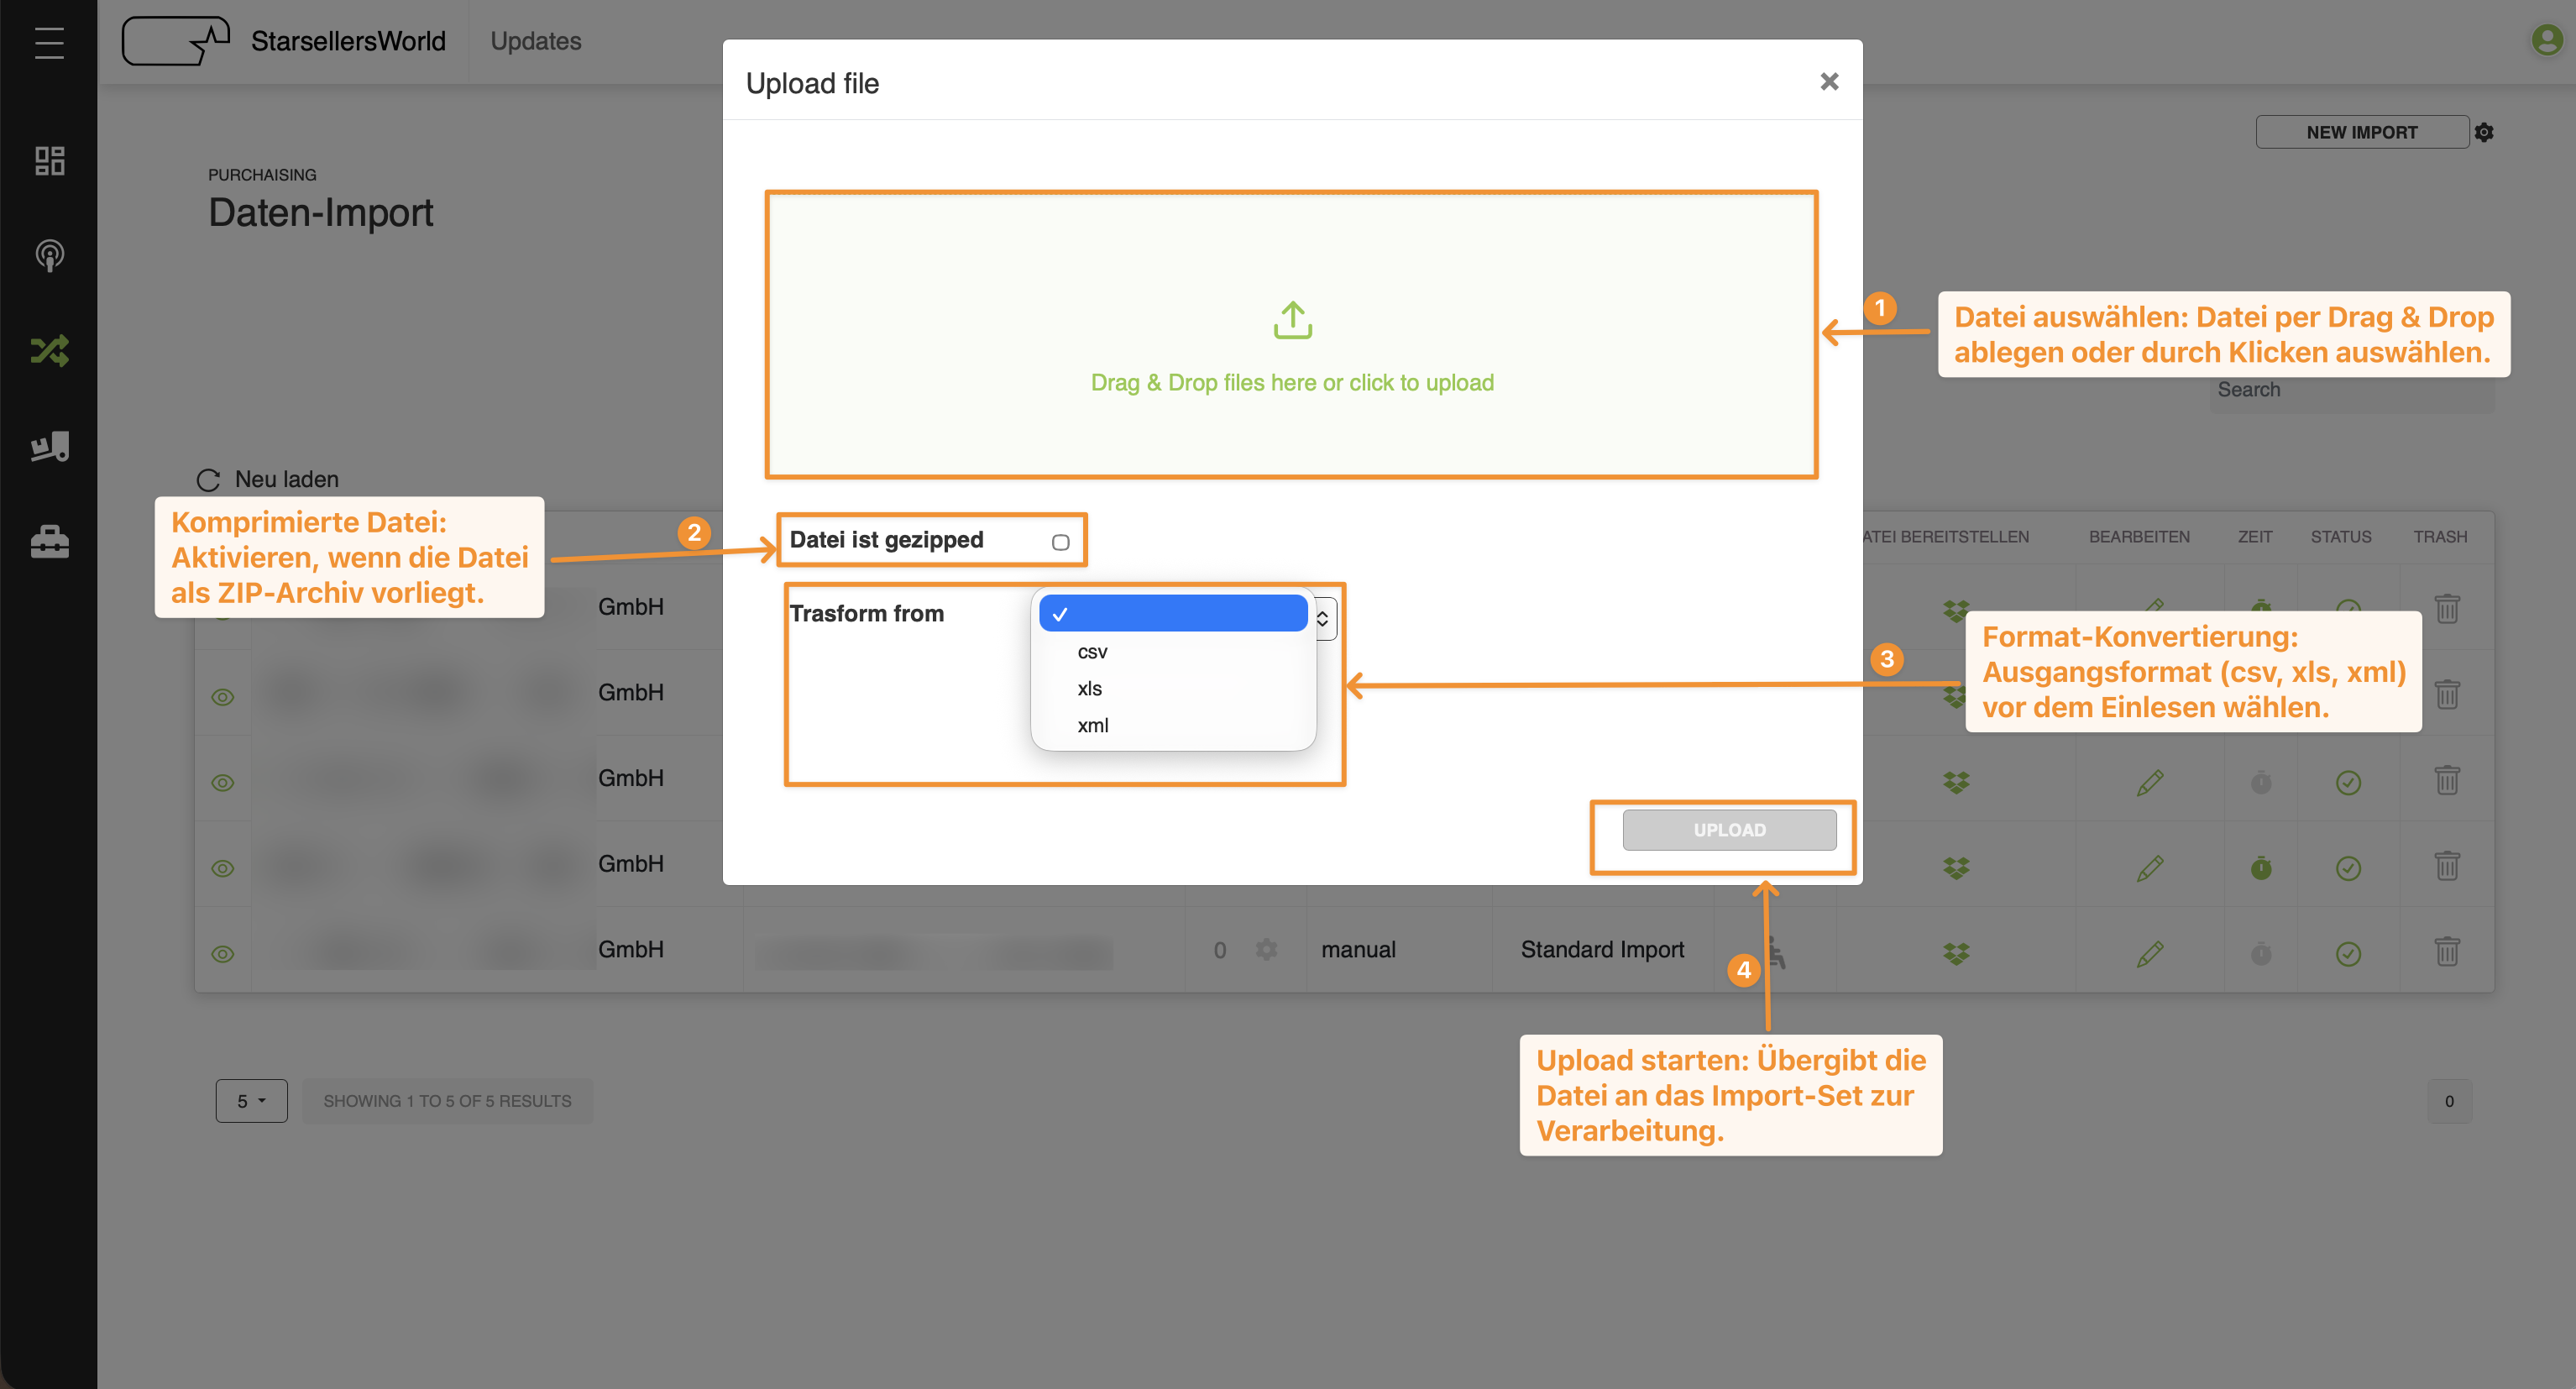
Clicking the green box icon in the DATEI BEREITSTELLEN column opens the Upload file dialog. This function is primarily used for sets of type manual or when an updated file needs to be imported immediately for an existing set.
Figure 3.4: Manual file upload with options for ZIP archives and format conversion (Source: images/data_import_04.png)Click to enlarge
1
Drag and drop the desired file into the green box (Drag & Drop files here or click to upload) or select it from your computer via mouse click.
2
Check the box Datei ist gezipped (File is zipped) if the uploaded file is a compressed ZIP archive.
3
If the source file must be converted prior to processing, select the source format (csv, xls, or xml) in the Trasform from dropdown menu.
4
Finally, click UPLOAD to hand over the file to the Import Set for processing.
3.3.2 Schedule Execution Times (Time Settings)
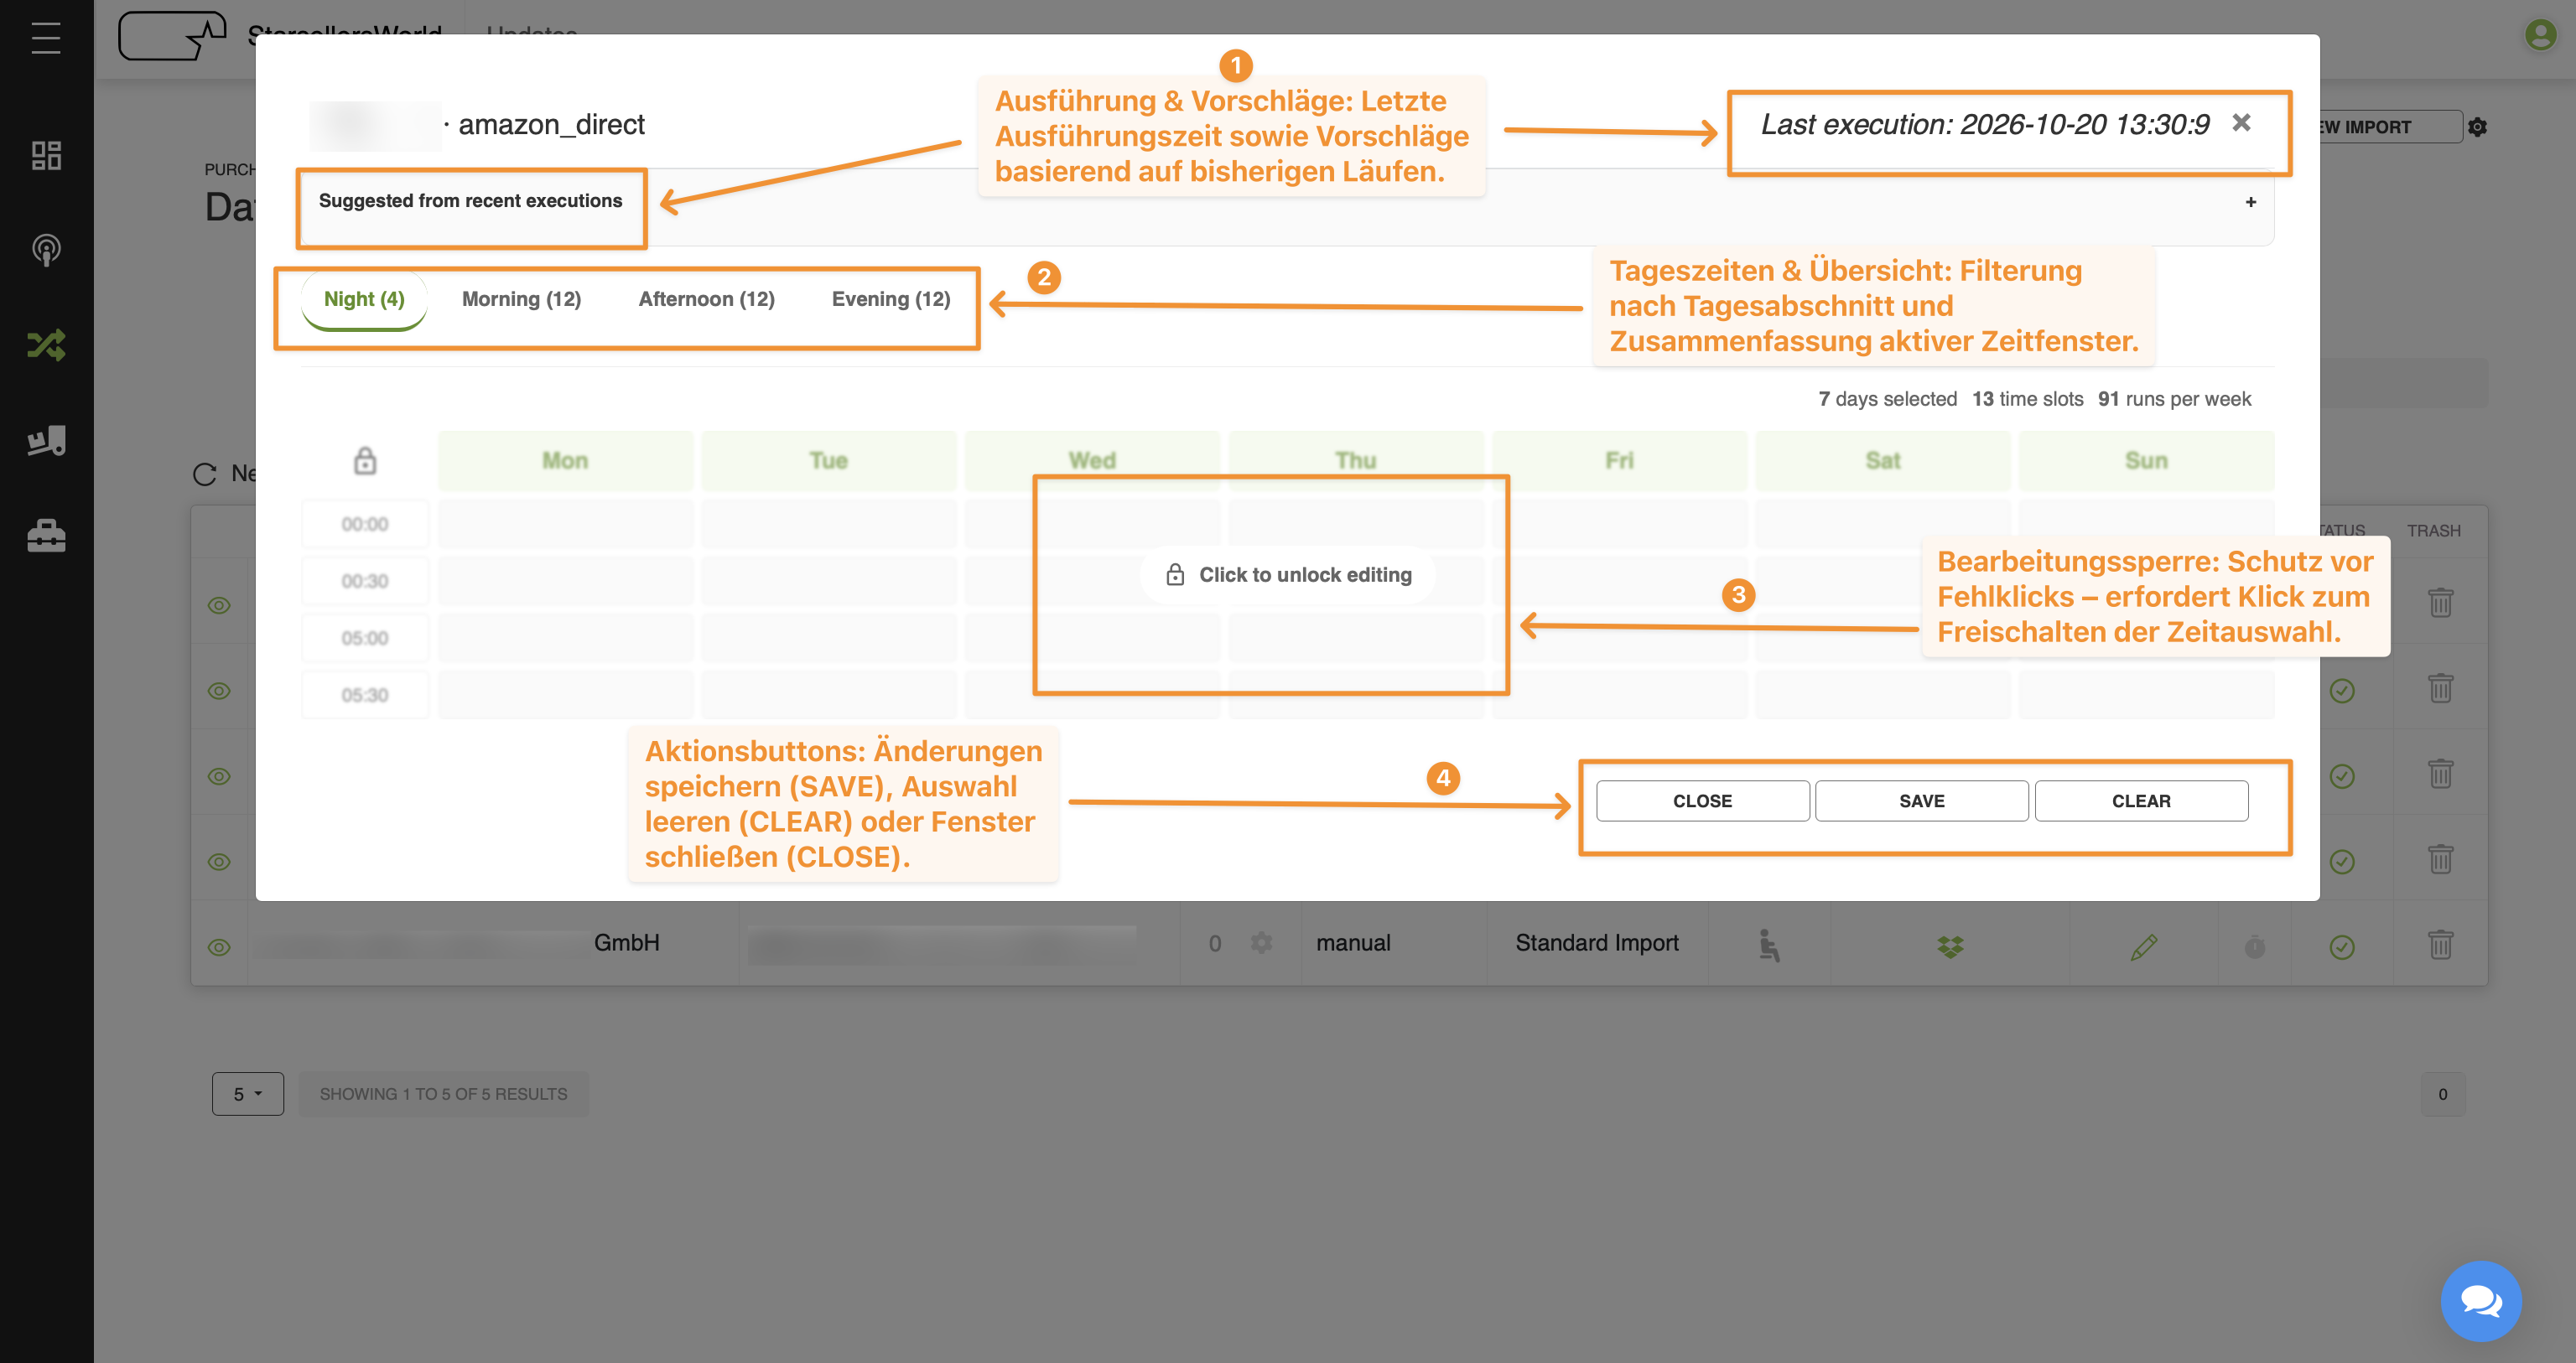
Clicking the green clock icon in the ZEIT column opens the scheduler for an automatic Import Set. Here you define in 30-minute intervals on which days of the week and at what times the import runs automatically.
Figure 3.5: Time scheduler for automatic Import Sets with edit lock protection (Source: images/data_import_05.png)Click to enlarge
1
Header & Suggestions: Displays the name of the set, the timestamp of the Last execution, and expandable suggestions based on previous runs (Suggested from recent executions).
2
Time-of-Day Filters & Summary: Divides the day into Night (4), Morning (12), Afternoon (12), and Evening (12). On the right, the system summarizes the current selection (e.g., 7 days selected | 13 time slots | 91 runs per week).
3
Unlock Editing (Click to unlock editing): To prevent accidental changes to the production schedule, the time grid (Mon to Sun) is locked by default. Click Click to unlock editing in the center first to enable or disable time slots.
4
Action Buttons: Click SAVE to save the new schedule, CLEAR to reset the current selection, or CLOSE to exit without saving.
Clicking NEW IMPORT (top right) or the green pencil icon (BEARBEITEN) in a table row takes you to the detailed configuration of an Import Set. The page is divided into basic settings and three expandable configuration sections: Connection (Data Source), Column Mappings, and Intelligent Rules.
3.4.1 Basic Settings and Import Intent
In the upper header area, you define the identification and fundamental behavior of the Import Set.
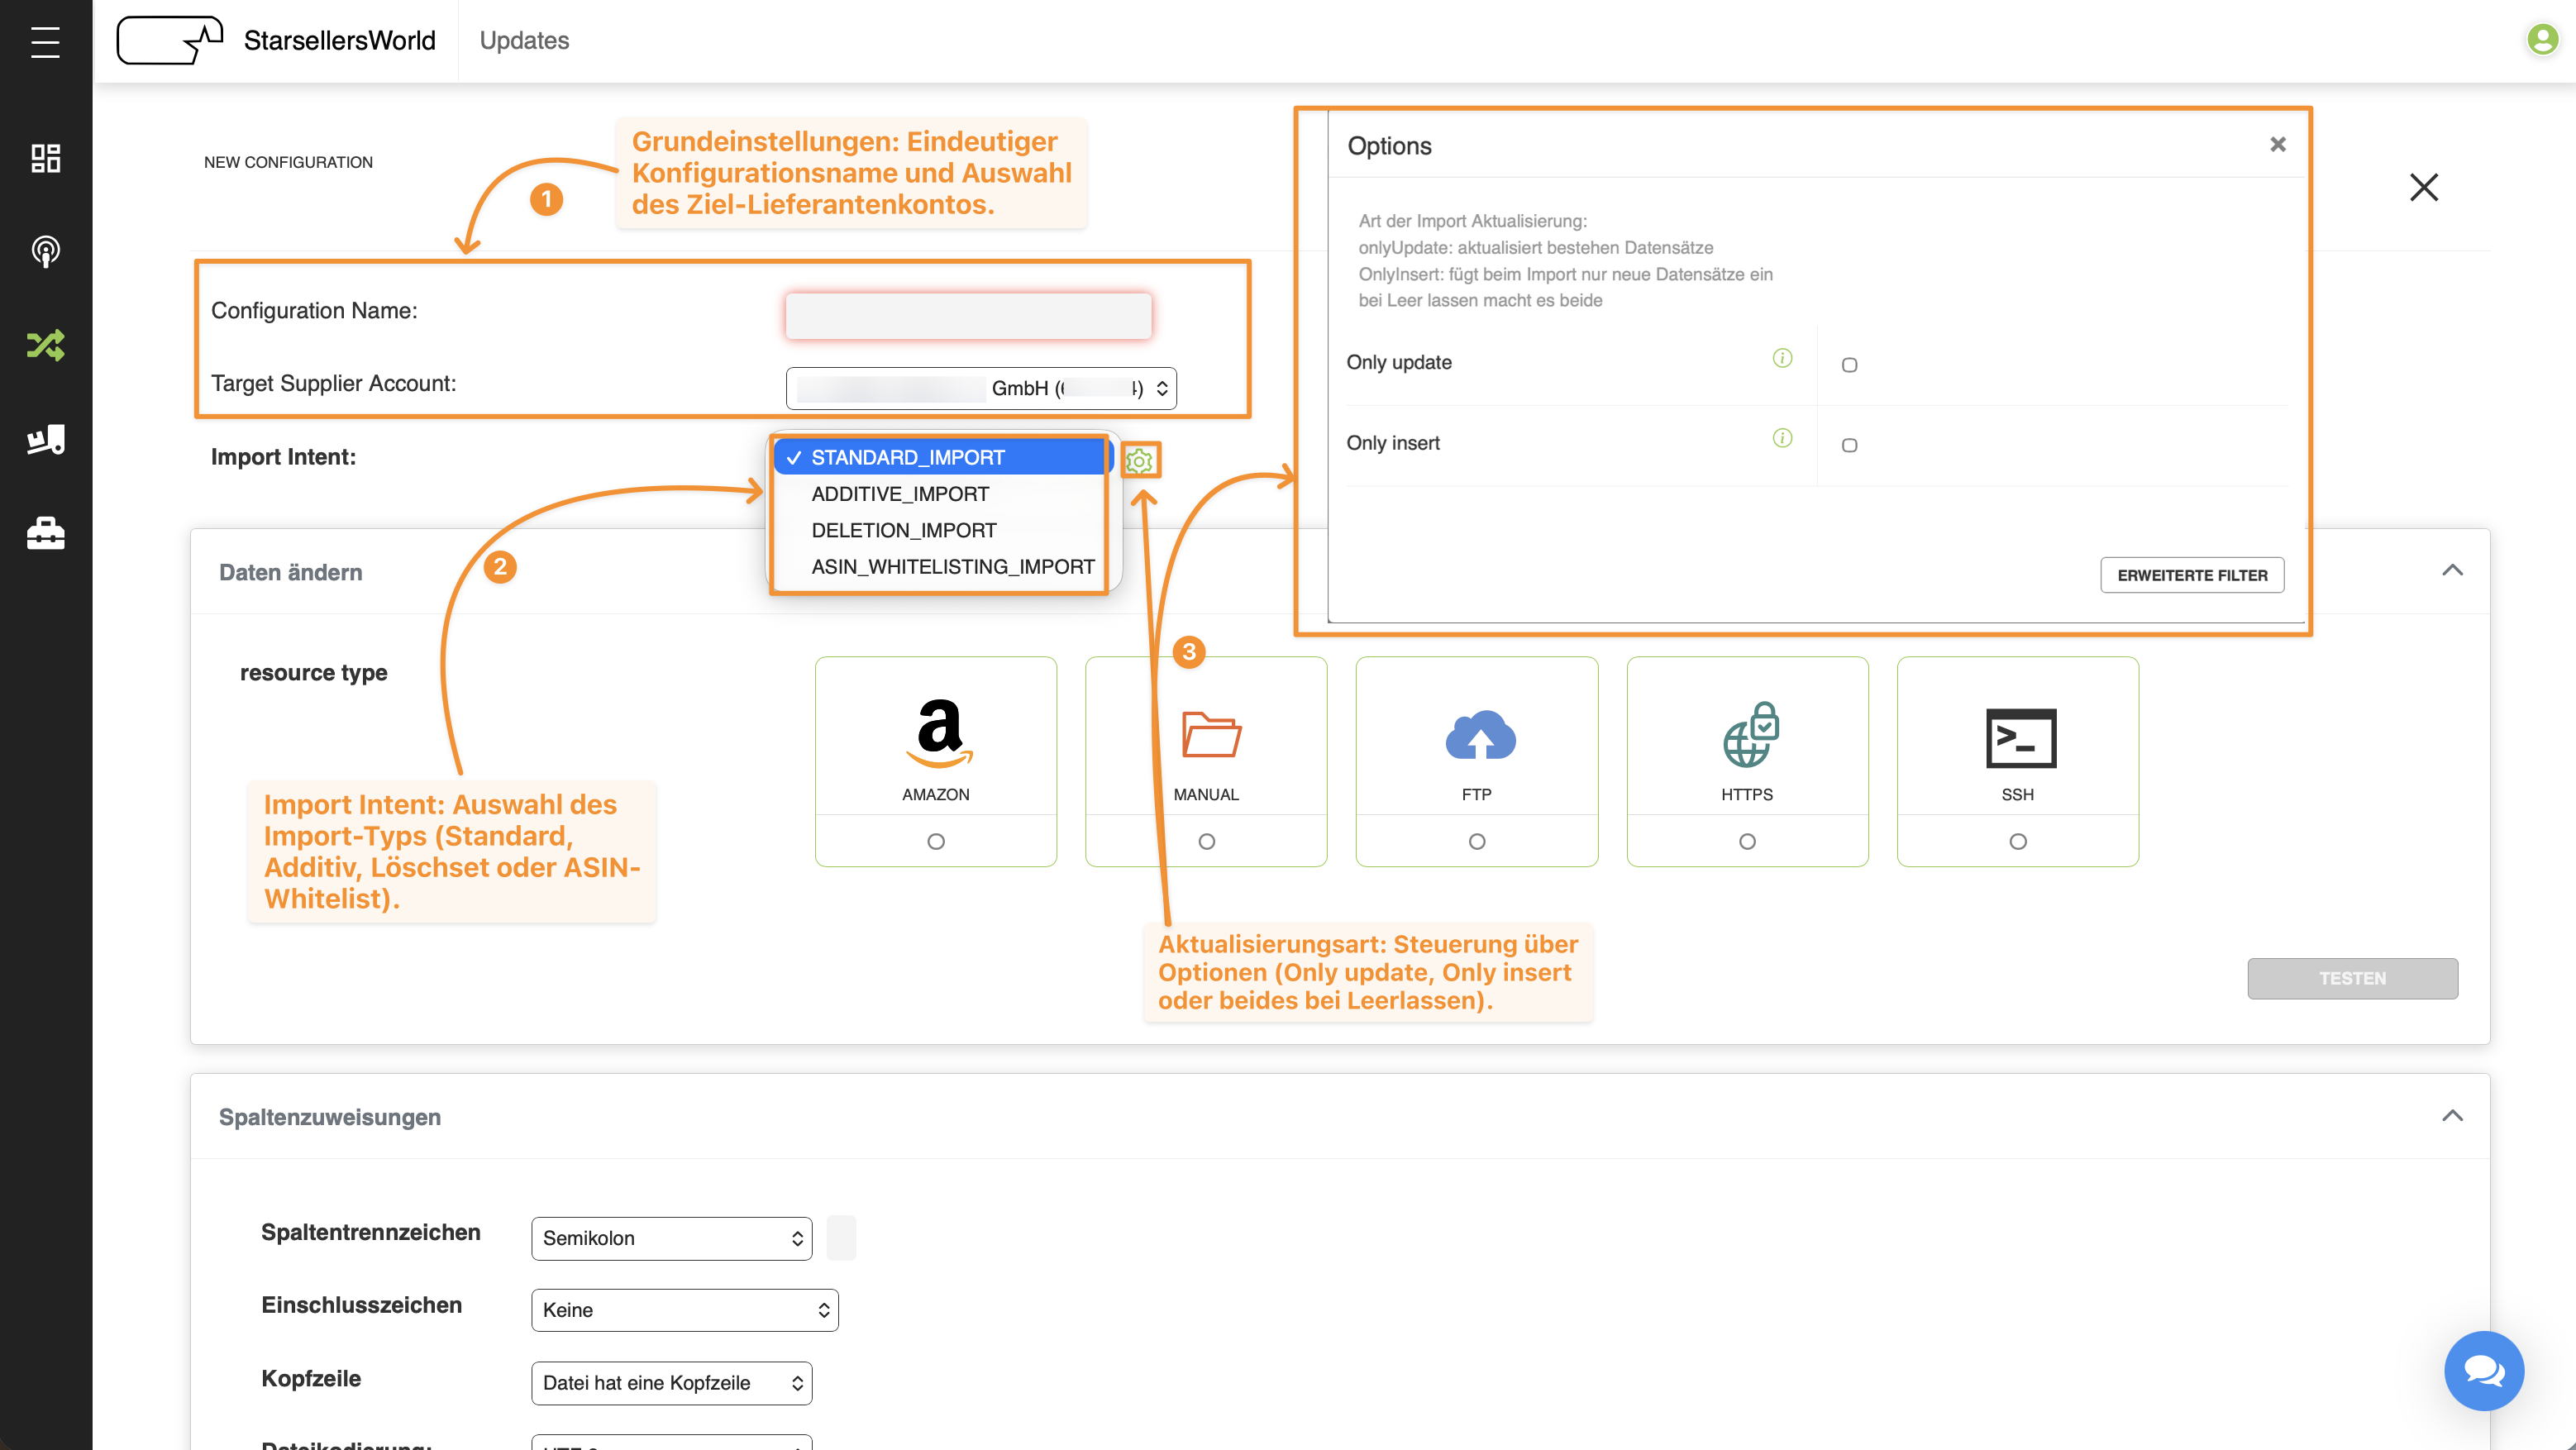
Figure 3.6: Selecting the Import Intent and configuring update options (Only update / Only insert) (Source: images/data_import_06.png)Click to enlarge
1
Configuration Name & Target Supplier Account: Assign a unique name for the Import Set and select the associated supplier or target account.
2
Import Intent (Purpose): When creating a new set, you determine the fundamental import logic here (for existing sets, this field is locked against accidental switching):
STANDARD_IMPORT: Regular import for creating and updating product, stock, and price data.
ADDITIVE_IMPORT: Supplementary import for adding additional data records.
DELETION_IMPORT: Special CSV deletion set used to specifically remove transmitted items from inventory.
ASIN_WHITELISTING_IMPORT: Import for targeted whitelisting of ASINs.
3
Update Mode (Green Gear Icon next to Import Intent → Options): Opens the options popup for fine-tuning standard imports:
Only update: Exclusively updates existing records already present in the system (no new items created).
Only insert: Exclusively inserts new records during import without overwriting existing items.
Leave both options unchecked: The system performs both updates of existing items and creation of new products simultaneously.
3.4.2 Configure Connection (Data Source)
In the Connection section (Daten ändern / Data Source), select one of five supported transmission paths under resource type. The input mask adapts automatically depending on the selected source:
Data Source (resource type)
Required Details and Options
AMAZON
Select the desired sales interface (Account) as well as the Import type (e.g., product import).
MANUAL
For sets whose files are uploaded manually via the table overview (DATEI BEREITSTELLEN).
FTP
Requires Hostname, Port, Filename (Dateiname), and Directory (Verzeichnis), plus Username and Password if Authorization is enabled. You can also define Datei ist gezipped and Trasform from (csv, xls, xml).
HTTPS
Import via a direct web link (URL). Requires the Url, optional Authorization, and if needed settings for ZIP archives and format conversion.
SSH
Secured SFTP/SSH connection. Contains all fields of the FTP configuration and additionally offers the Public key option for key-based authentication.
Practical Tip: After entering connection credentials, always click TESTEN (or TEST NOW) at the bottom right of the section to verify that the source is reachable and the file can be read properly.
3.4.3 Column Mappings and Field Options
In the Column Mappings section (Spaltenzuweisungen), you define the file format and map the columns of your source file (A, B, C, D, etc.) to the corresponding system fields in Products Light.
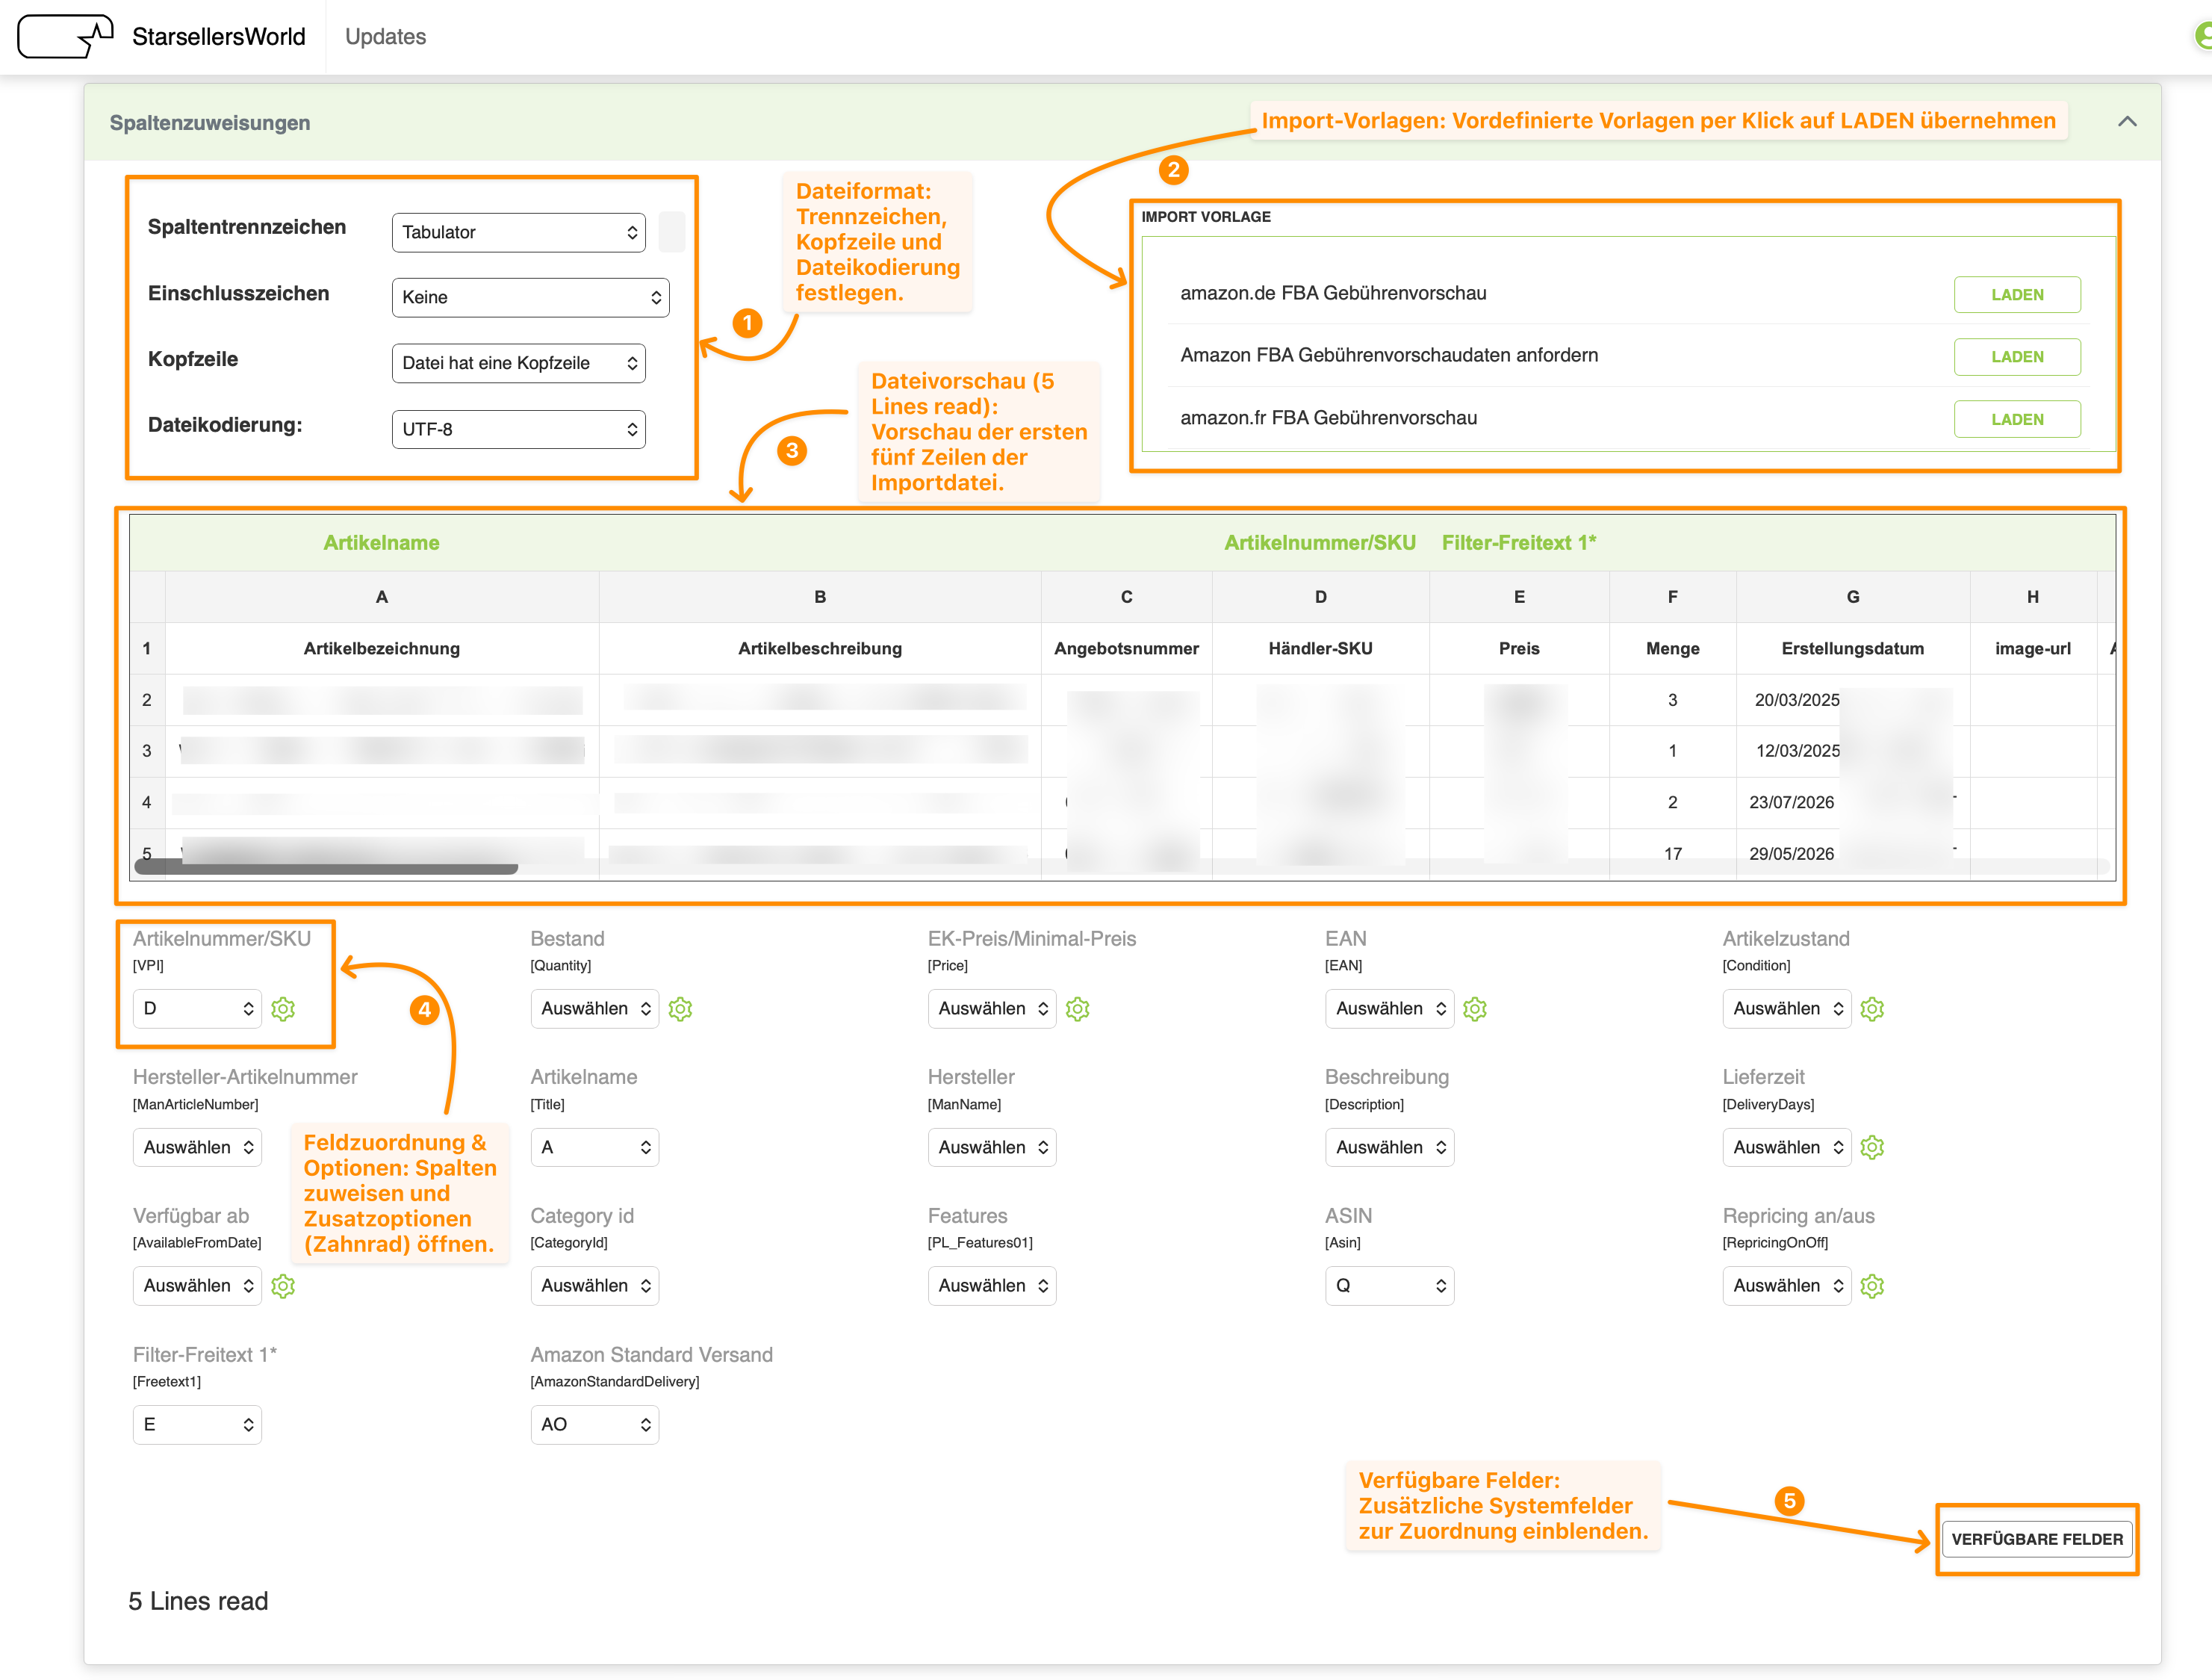
Figure 3.7: Column mapping with file preview, template loader, and advanced field options (Source: images/data_import_07.png)Click to enlarge
1
Format and Encoding Settings (Top Left): Define the column delimiter (Spaltentrennzeichen, e.g., Tab or Semicolon), enclosure character (Einschlusszeichen, e.g., None), header row (Kopfzeile: Datei hat eine Kopfzeile), and file encoding (Dateikodierung, recommended: UTF-8 for accurate display of special characters/umlauts).
2
IMPORT TEMPLATE (IMPORT VORLAGE, Top Right): For standardized file formats (e.g., Amazon FBA fee preview, item files, or plentyMarkets), you can apply a preconfigured mapping template directly by clicking LADEN (Load).
3
File Preview (5 Lines read): Displays the first five read lines of the file as a table (A, B, C, D...). Already mapped system fields are highlighted in the green bar above the respective column (e.g., Artikelname above Column A, Artikelnummer/SKU above Column D).
4
Field Mapping & Field-Specific Options (Green Gear Icon): Below the preview, select the matching column letter for each required system field—such as Artikelnummer/SKU [VPI], Bestand [Quantity], EK-Preis/Minimal-Preis [Price], EAN, Artikelzustand [Condition], Lieferzeit [DeliveryDays], or ASIN. Clicking the green gear icon next to a field opens advanced processing options: for example, under Artikelnummer/SKU (VPI Options), SKUs can be automatically truncated (Shorten sku / Shorten sku length) or extended with a prefix/suffix (Articlenr extension / Artilclenr extension pos).
5
AVAILABLE FIELDS (VERFÜGBARE FELDER / Select_Fields): If a required target field is not visible in the default selection, click VERFÜGBARE FELDER at the bottom right to open the catalog of 379 system fields (grouped into essential, product basic, others, repricing, ebay only, ebay pim, amazon only, and platform attributes) and enable the desired fields via checkbox.
3.4.4 Intelligent Rules
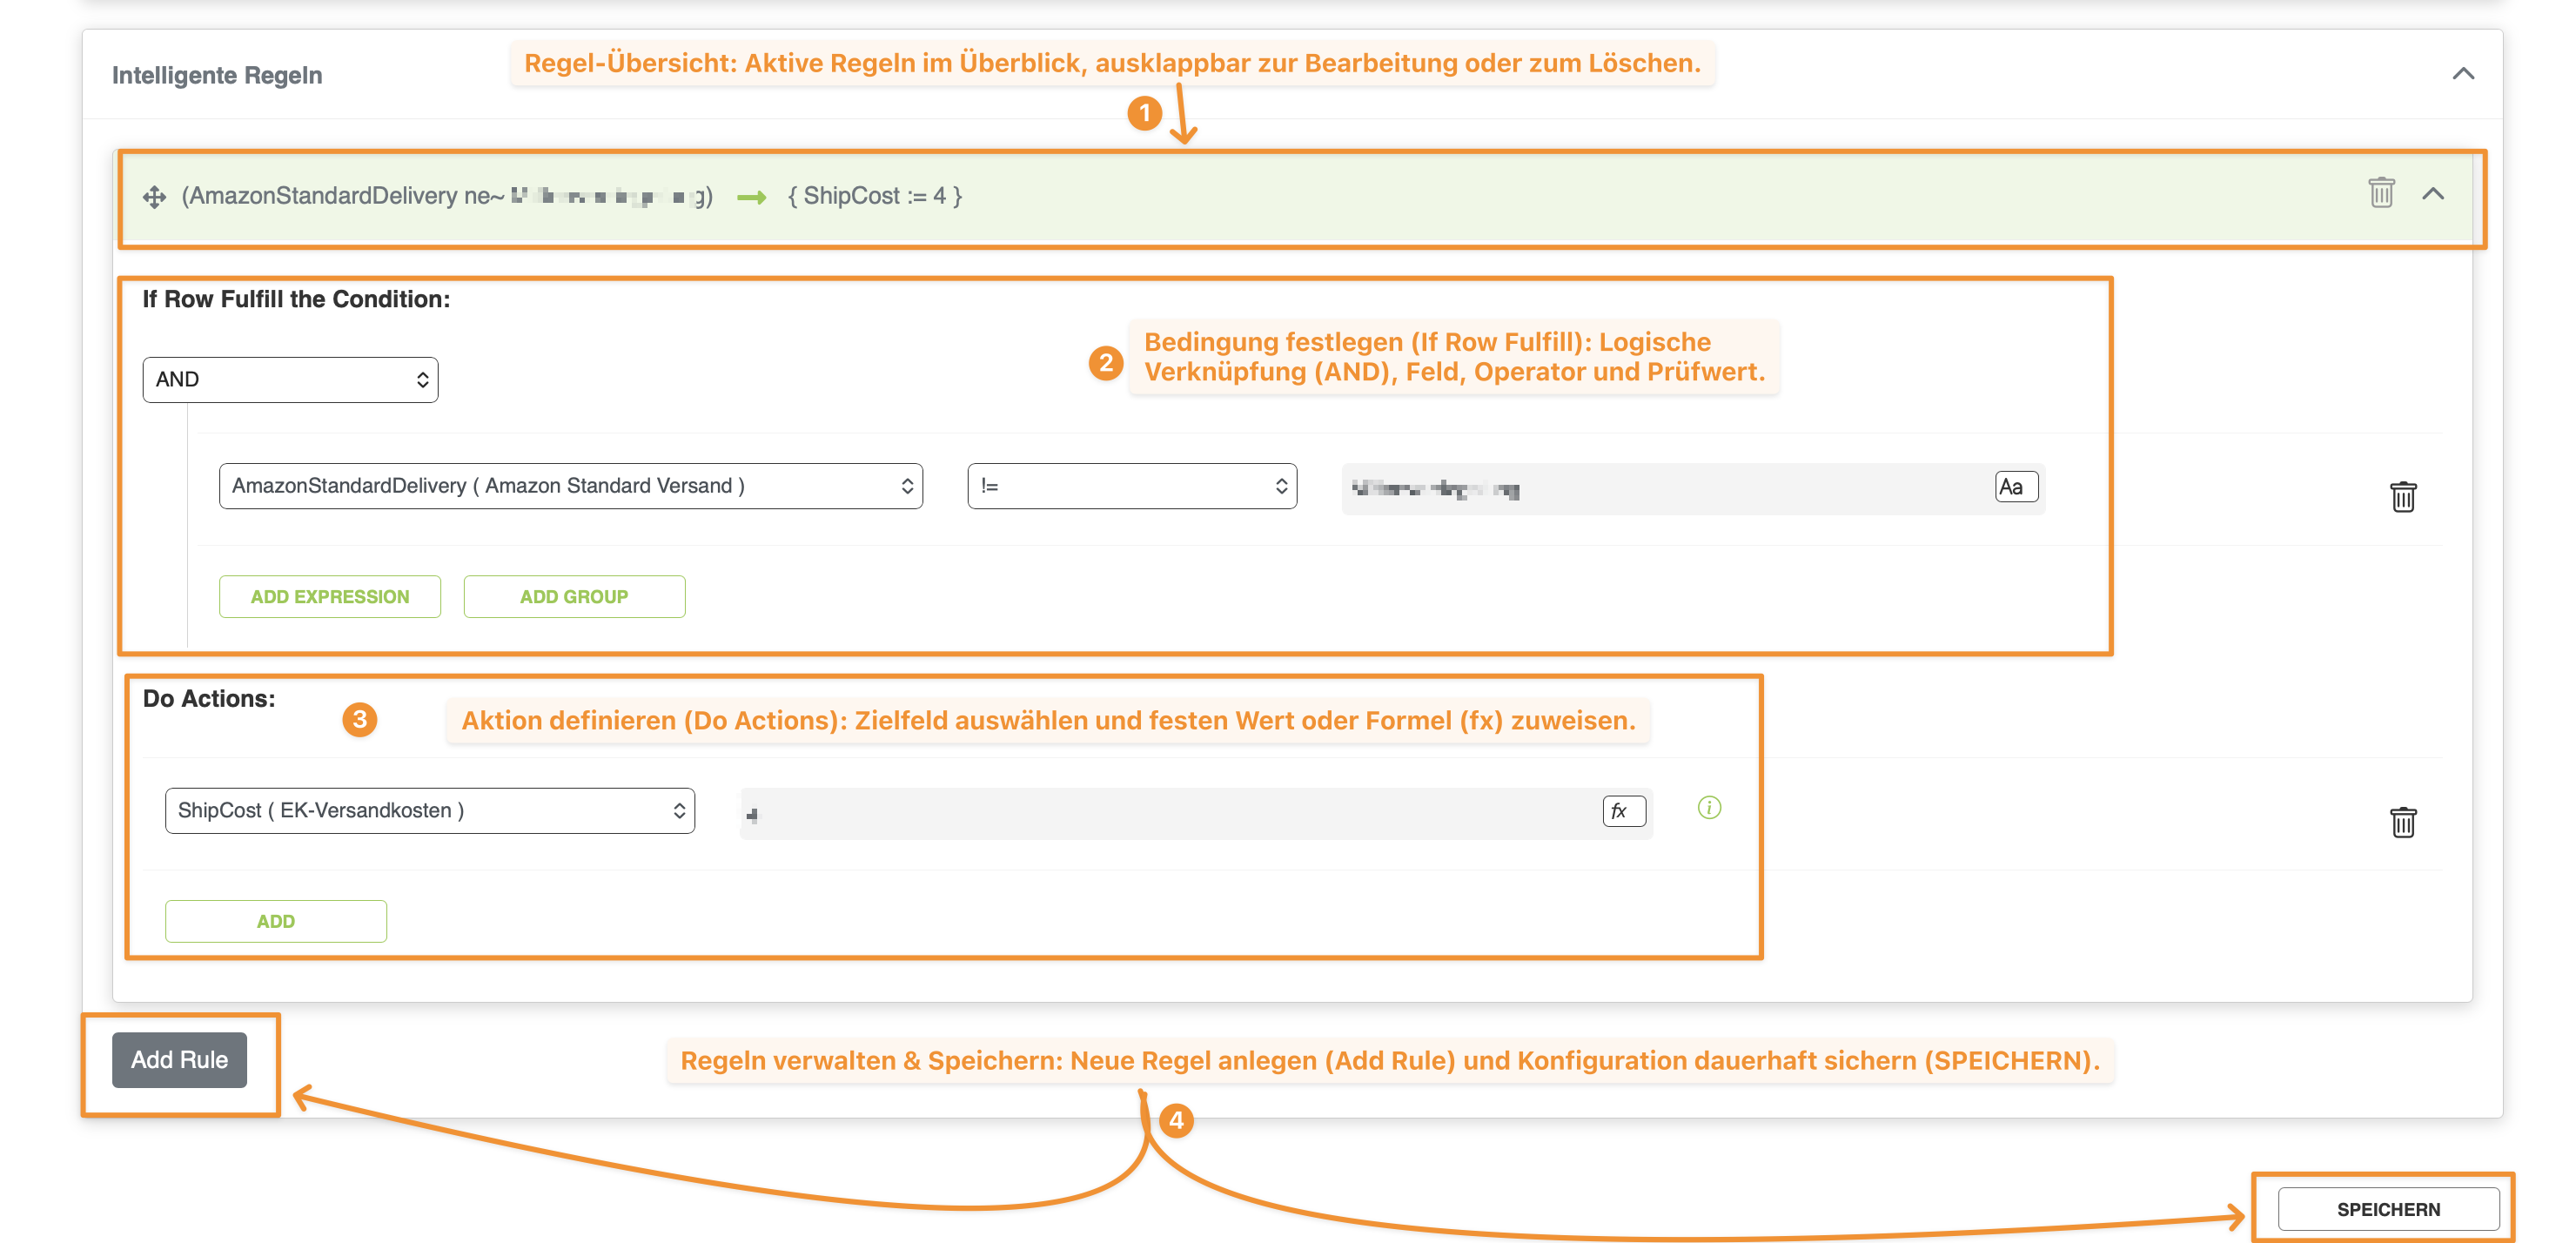
The lower Intelligent Rules section (Intelligente Regeln) allows you to automatically filter or modify imported values during the import process based on If-Then conditions (If Row Fulfill the Condition → Do Actions).
Figure 3.8: Creating conditional import rules in the Intelligent Rules section (Source: images/data_import_08.png)Click to enlarge
1
Rule Overview: Displays active rules in compact shorthand notation, e.g., (AmazonStandardDelivery ne~ ...) -> { ShipCost := 4 }. Use the arrow on the right to expand the rule for editing; the trash icon deletes the rule.
2
Define Condition (If Row Fulfill the Condition): Select the logical operator (e.g., AND), the data field to evaluate (e.g., AmazonStandardDelivery), the comparison operator (e.g., != for "not equal to"), and the comparison value. Multiple conditions can be combined via ADD EXPRESSION or ADD GROUP.
3
Define Action (Do Actions): Specify which target field (e.g., ShipCost ( EK-Versandkosten )) should be set to which fixed value or formula (fx) when the condition is met.
4
Add Rule & SAVE (SPEICHERN): Use Add Rule to create an additional rule. Finally, click SPEICHERN at the bottom right to permanently save all changes to the Import Set.
Expand important Import Sets via the green eye icon and check not only the success status but also the #_OF_ROW column (row count) to detect empty source files early.
Manual File Upload
When uploading via DATEI BEREITSTELLEN, pay attention to whether the file is compressed (Datei ist gezipped) or needs to be converted from another format (Trasform from: csv, xls, xml).
Adjust Schedule
The time grid under ZEIT is locked to protect against accidental clicks. Only unlock the view deliberately via Click to unlock editing and save changes with SAVE.
Connect New Source
After entering FTP, HTTPS, or SSH credentials, always click TESTEN first before configuring column mappings.
Protect Inventory Data
Carefully verify the Import Intent (STANDARD_IMPORT vs. DELETION_IMPORT) as well as the Only update / Only insert options before saving a set or starting it via RUN NOW.
How can I tell the difference between automatic and manual imports in the table?
Automatic imports (e.g., amazon, ftp) have a priority number (1, 2, 3...) with a green gear icon in the SEQUENZ column and an active green clock icon under ZEIT. Manual imports are set to SEQUENZ 0 (gray gear icon), and the clock icon is disabled.
What is the difference between the eye icon and the pencil icon (BEARBEITEN)?
The green eye icon on the left only expands the status and execution history (Import Log) for safe inspection. The pencil icon (BEARBEITEN) on the right opens the technical configuration of the Import Set.
Why can't I click any times in the schedule planner (ZEIT)?
The time matrix is locked by default against accidental changes. Click Click to unlock editing in the center of the window first to enable editing.
What do the options "Only update" and "Only insert" do during a Standard Import?
With Only update, only existing items are updated; with Only insert, only completely new items are created. If both checkboxes are left empty, the system performs both simultaneously.
How do I set up a CSV deletion set to specifically remove items?
Create a new configuration via NEW IMPORT and select DELETION_IMPORT in the Import Intent field. Use this import type with extreme caution, as transmitted items will be removed from inventory.
Where can I find additional fields for column mapping if a field is missing?
Click VERFÜGBARE FELDER at the bottom right of the Column Mappings section. In the Select_Fields window, you can enable additional attributes out of 379 system fields (e.g., for Repricing, eBay, or Amazon).